Let’s look over some brief instructions provided by Rock!
Check-In Manager
It’s critical for growing organizations to be able to view check-in data in real-time and react by opening and closing locations in response. Rock provides a check-in management site that gives your staff a dashboard of live check-in data and lets them respond to needs as they occur in real-time.
The Phases of Check-in
The check-in process doesn’t necessarily end when someone finishes checking in. A person can be Checked-in, Present or Checked-out. For now, it’s only important to be aware of the different states a person can be in.
Checked-in
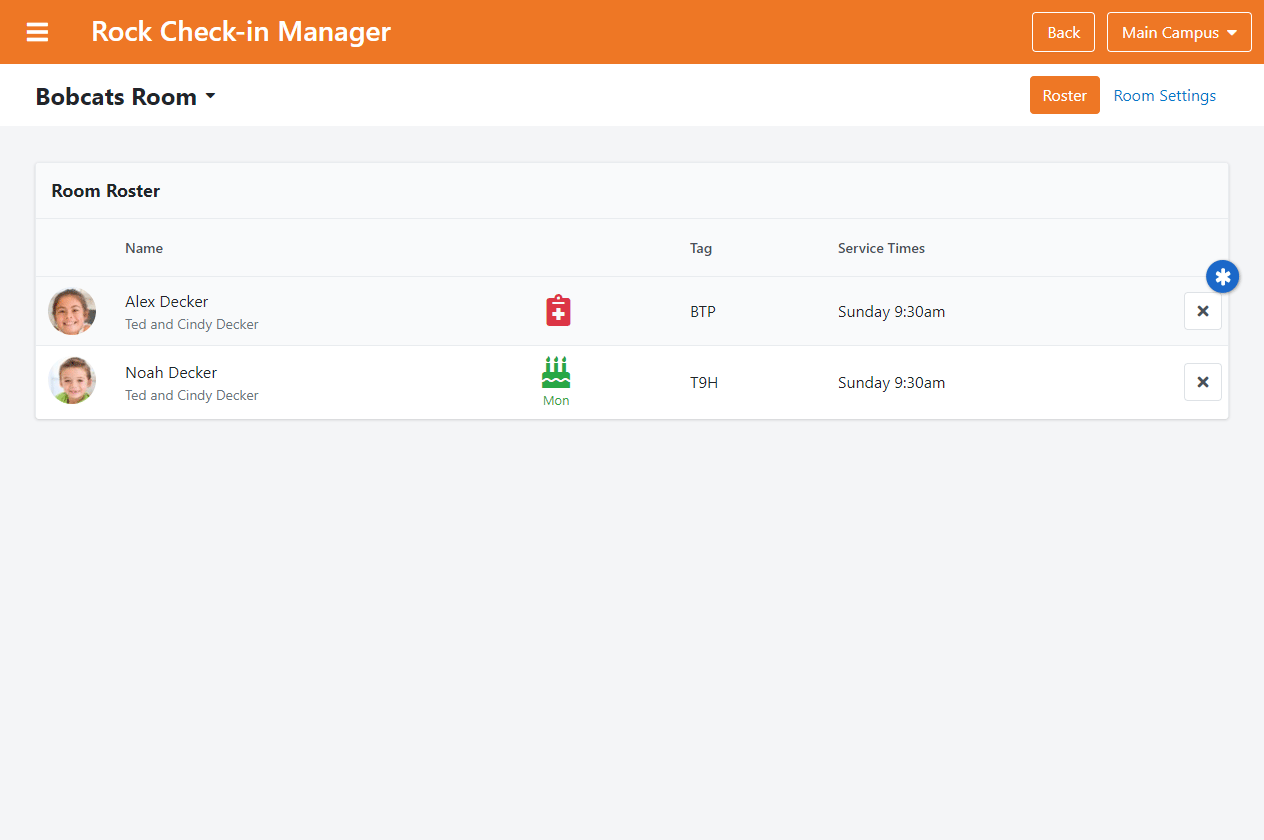
When a person finishes the check-in process, they will appear as Checked-in on the roster.
The person will be Checked-in unless the Check-in Manager is used to Cancel their check-in entirely.
Present
While we are not currently using this feature for CedarCreek Kids… the potential exists moving into the future.
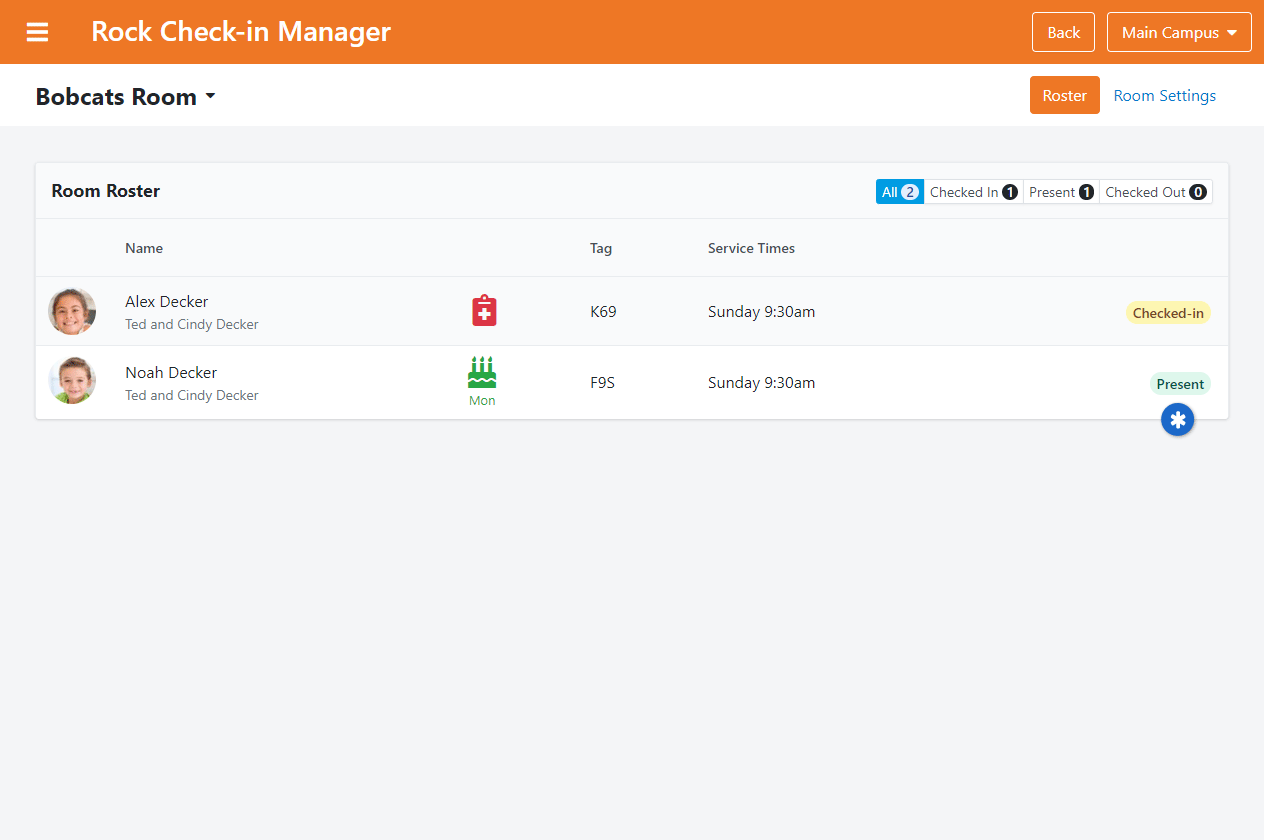
Being checked-in isn’t always the same as being in the room or location. A lot can happen between checking in on your phone from the parking lot and arriving in the intended space. Rock’s Presence feature lets you keep track of who is physically in a seat, making it easy to see how many of your checked-in guests are in the room or not. A person must complete check-in before they can be manually marked as Present in the Roster.
Checked-out
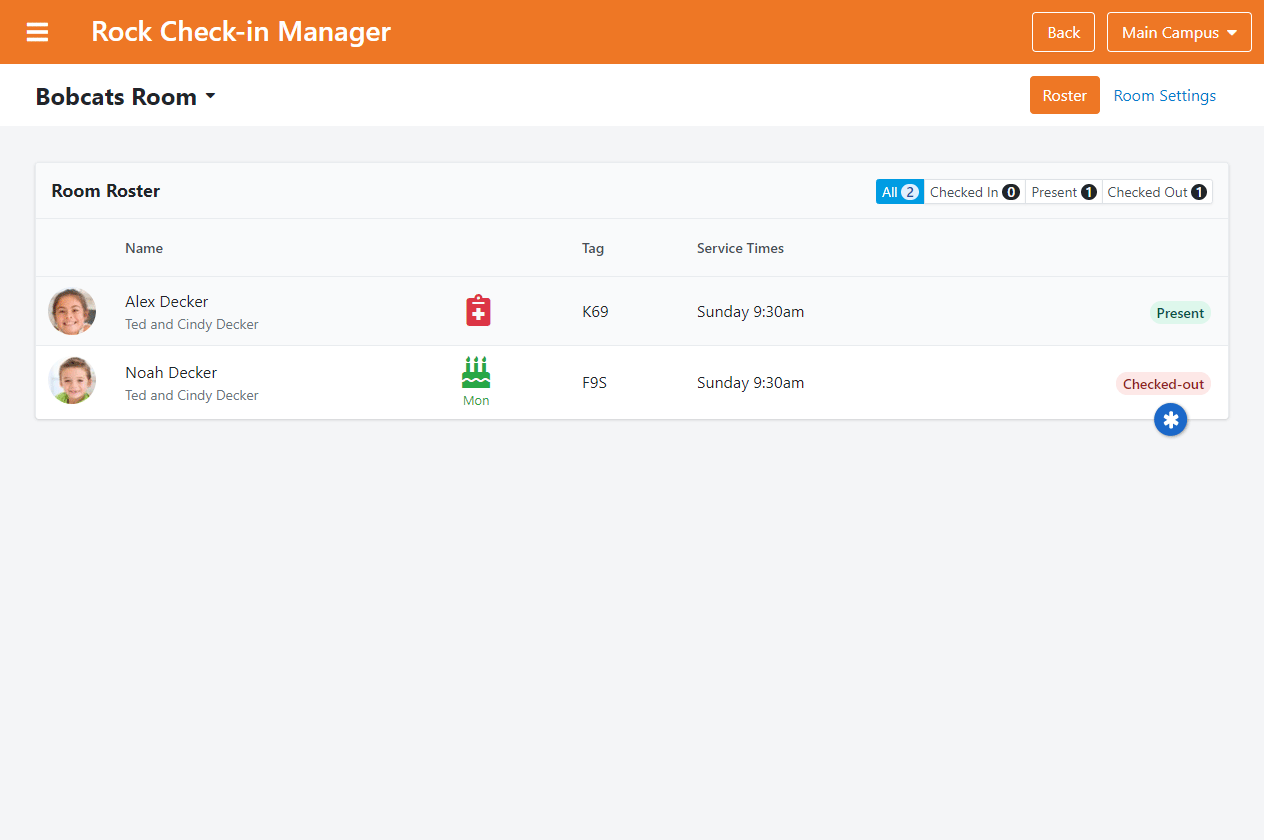
At times, people will need to leave earlier than planned. If Allow Checkout is enabled in your Check-in Configuration, you can indicate that someone has left the room. The person will still appear in the Roster as Checked-out and the check-in is not removed from their record.
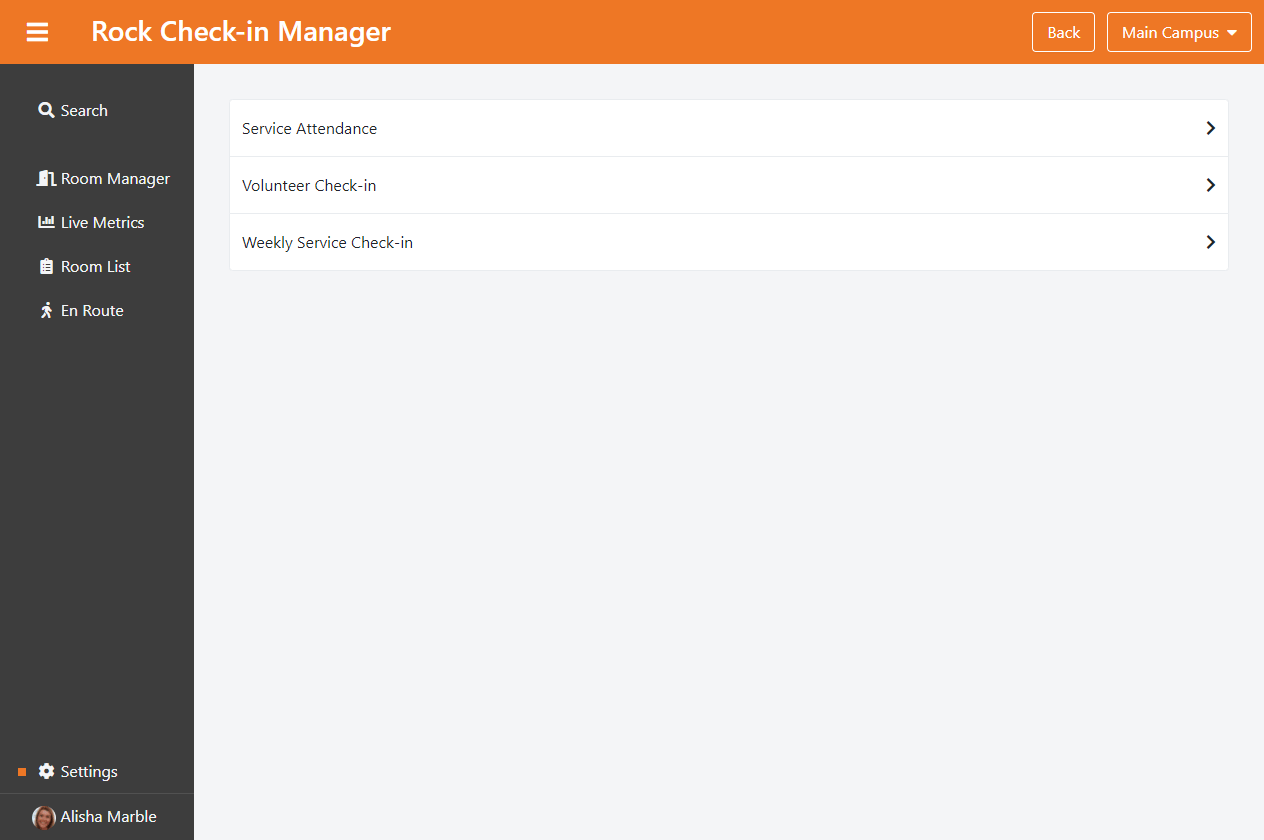
Using the Check-in Manager
- Logging into Rock
- Navigating to Checkin Central
- Clicking on Checkin Manager
When you access this screen for the first time, you’ll be prompted to select a campus if you have more than one to choose from. Next, you’ll select a Location near the top-left to see the Room Roster for that Location. Let’s look at what we can do from there.
Mobile Friendly
Check-in Manager was designed with kiosk devices of all sizes in mind. That means the pages might look a little different from the below screenshots if you’re working with a smaller screen. For instance, the Tag and Service Times columns will be combined into a single column at some resolutions. Similarly, you’ll notice icons (e.g. ) instead of words (e.g. ‘Present’) for the check-in states.
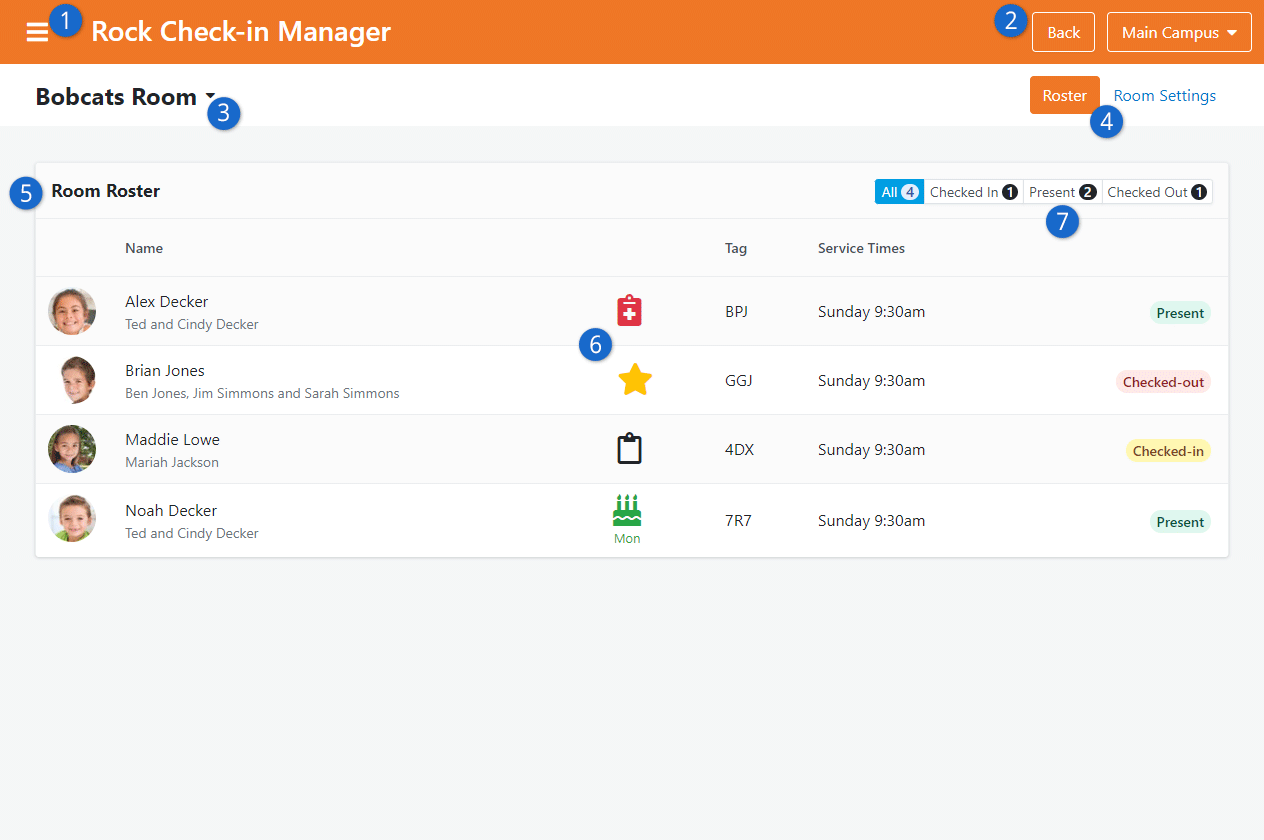
- Navigation Panel – Click the three horizontal lines (the icon) to open the navigation panel. From here you can access other areas of the Check-in Manager.
- Campus Selection – As applicable, you can use this drop-down to switch between your campuses, to show rosters for rooms at different campuses.
- Location Selection – You can select or change the Location here. This will update the Roster being viewed.
- Roster / Room Settings – Click here to toggle back and forth between the Roster and the Room Settings views. From the Room Settings view you can Close or Open the selected room.
- Room Roster – The roster will show anyone with check-in data for the selected Campus and Location. This includes people who may have been checked out of the room. The roster gives you a lot of information about each person, including check-in label codes and their check-in state. You can click on any row in the roster to view additional details about the person.
- Person Information Icons – These give you a visual clue that the person has things like legal notes, allergies or an upcoming birthday. In this example Alex Decker has an allergy you might want to know about, and Maddie Lowe has a legal note.
- Room Roster Filter – You’ll only see if these buttons if Allow Checkout and/or Enable Presence are enabled for the Check-in Type. The experience will be slightly different if only one or neither of those settings are enabled.
-
- All: Shows all the people who have checked in to the selected room. This is the view that is pictured in the screenshot above.
- Checked-In: This will show only people who have checked in, and who have not been Checked-out or marked as Present. This is also where staff will come to mark someone as Present when, for instance, the person physically arrives at the room. This only appears if Enable Presence is enabled for the Check-in Type.
- Present: This view will display only individuals who have been marked as Present. If Enable Presence is disabled for the Check-in Type then everyone who checks in is automatically considered Present. From here, staff can Check-out individuals who have left the room or are otherwise not considered present if Allow Checkout is enabled in the Check-in Type configuration.
Closing a Room
When you close a room using the Check-in Manager it can take several seconds for the room to show closed on the kiosks.
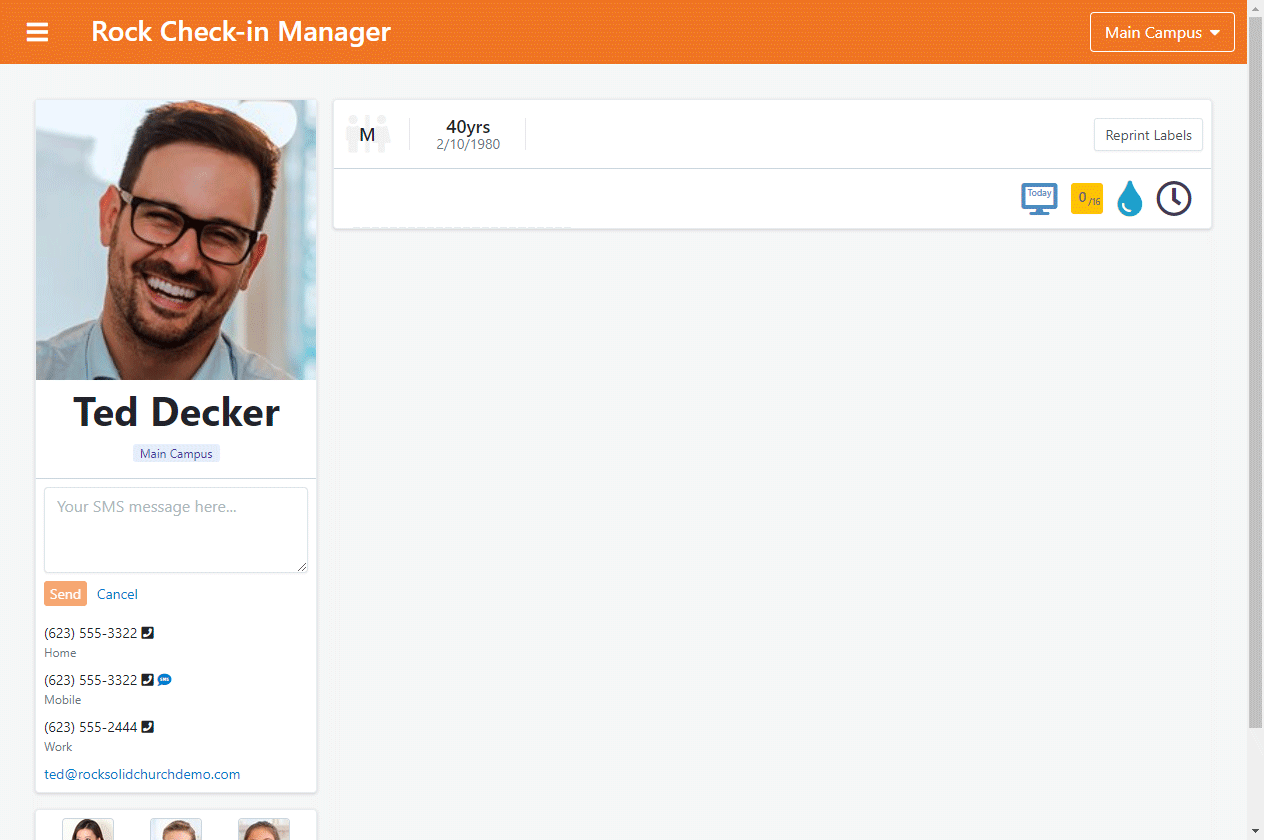
Check-in Manager Person Profile
There are lots of ways you can get to the Check-in Manager Person Profile page. Whether you arrived here from a Search, from the Room Manager or from Live Metrics, there’s a lot to see and do on this page.
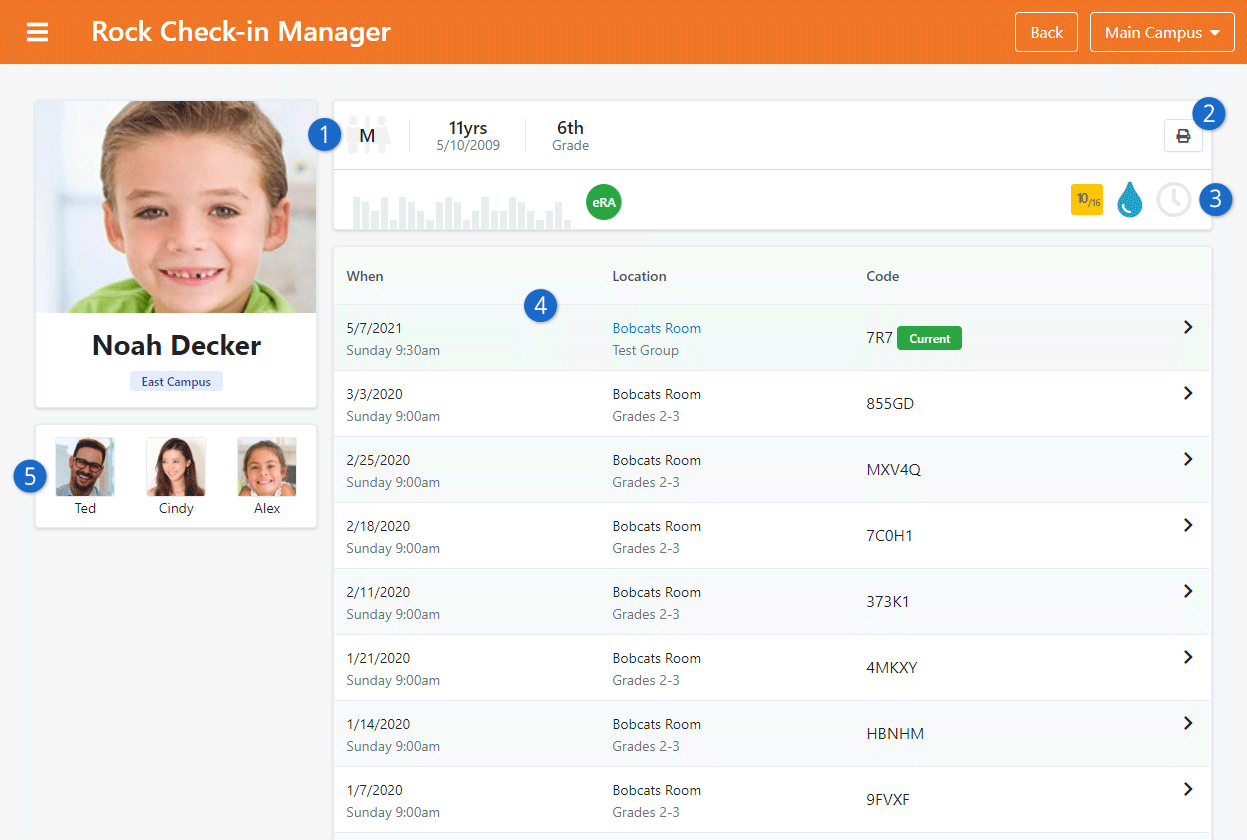
- Person Information – You can see the person’s photo and campus to the left, as well as their gender, age and grade along the top of the page.
- Reprint Labels – You won’t see this button if label reprinting is disabled. Otherwise, you can click here to reprint labels for the person. When you do, you’ll be asked to select which label(s) to print, and which printer should be used.
- Badge Bar – This bar will display very similar information about a person as you already see on their profile.
- Check-in History – The center of the page tells you just about everything you’d need to know about this person’s check-in history. You can see their Current check-in if one exists, as well as previous check-ins from other services. You might have noticed that Bobcats Room appears as a clickable link in the Current row. Click the link to access the Room Roster for that room. Lastly, you can click the ‘X’ icon to remove a check-in entirely.
- Family Members – Each family member for the person being viewed is displayed here. Click on any family member to view the Check-in Manager profile for that person. In this example there isn’t any contact information for the children, but phone numbers and emails for the parents will be displayed on their profile.
Navigating Check-in Manager
As noted above, you can click the icon at the top-left of the page to expand the Check-in Manger’s navigation menu. From here you can search for individuals, view check-in metrics, change Check-in Types or navigate back to the Room Manager described above in the prior section.
Searching for Individuals
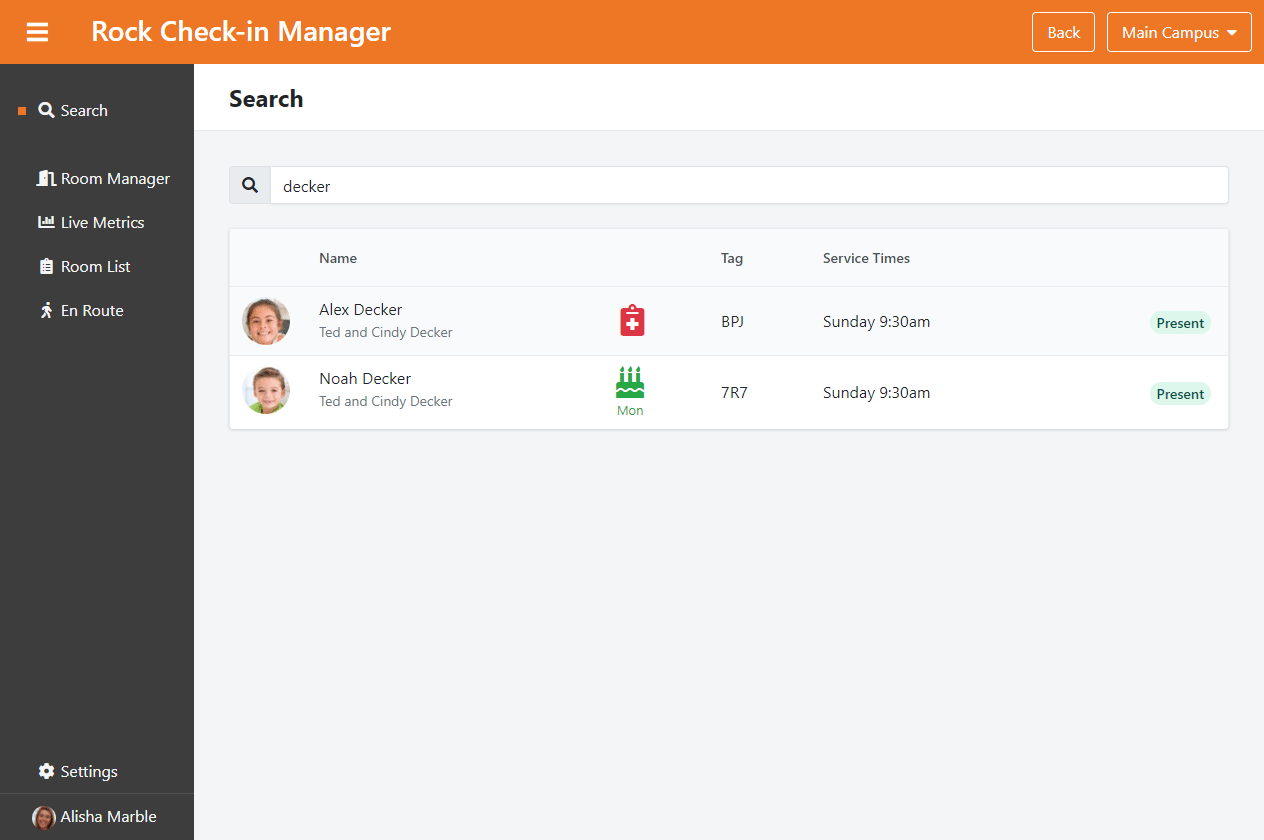
As pictured above, you can search for individuals and then select them from the list. In this example we searched for ‘Decker’ and we were provided with three of the four Decker family members. If you’re wondering where Cindy Decker is, she doesn’t have any check-in data for today so won’t appear in this list even though she’s still part of the Decker family and has previously checked into a group in this check-in configuration type.
Clicking on any person’s row within the search results will bring you to that person’s Check-in Manager profile.
Searching by Code
You can also search for a person by the check-in code assigned to them by the check-in system. You can then conduct the search in the same way as detailed above, entering the check-in code in the search field rather than the person’s name. Remember, check-in codes are only used once per day.
Live Metrics
The Live Metrics page shows you a lot about who is checked in, where and when they checked in. Let’s take a look at what can be seen here.
At the highest level, pictured below, you can see each of the check-in areas and how many people have checked in to all those areas.
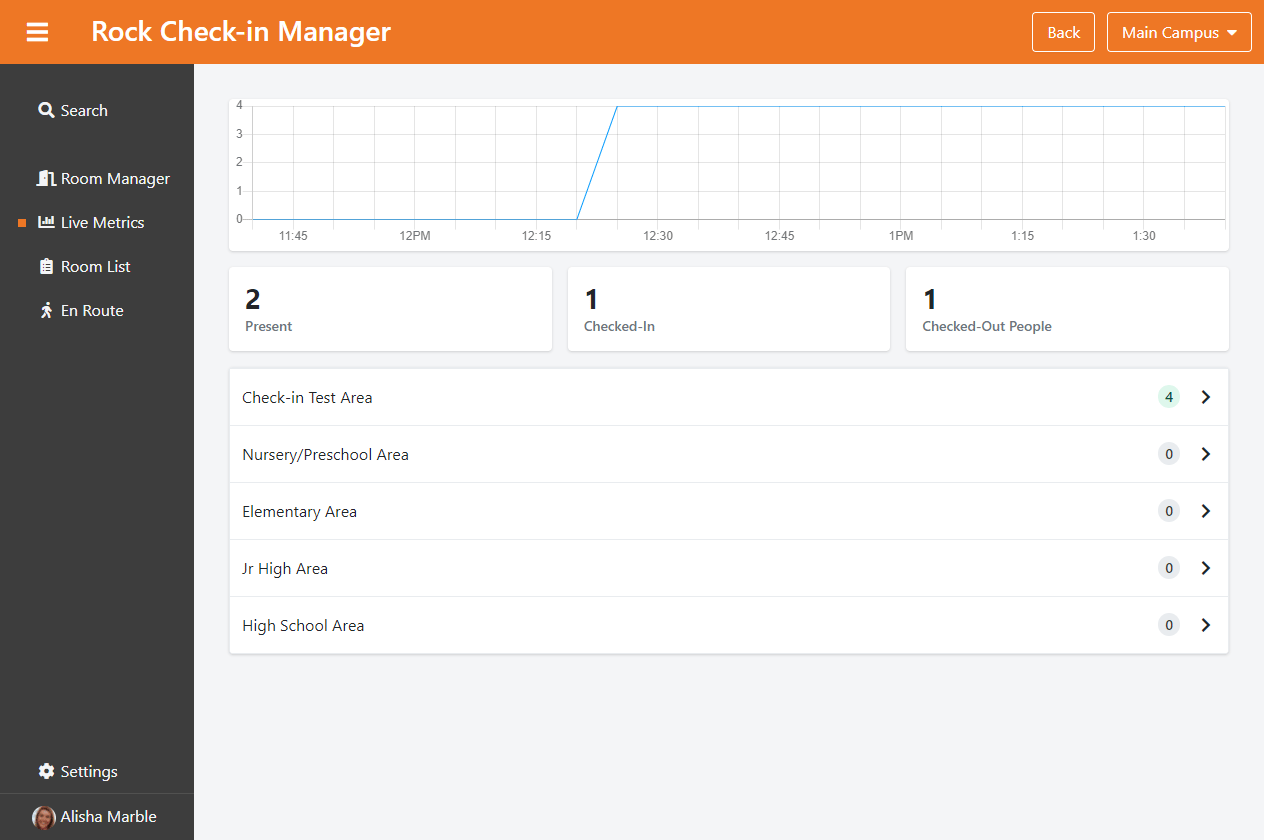
Clicking on any area will show you the groups, and then rooms, under that area. At each stage, the metrics pictured above will change to reflect your selection. In the screenshot above, you can see ‘7’ people are in the test area we’re using. If there was a capacity of 25 set for this room, you would see ‘7/25’ to show how close the room is to being filled.
Let’s take a close look below at the page after we’ve navigated all the way down from the areas to the individual room level.
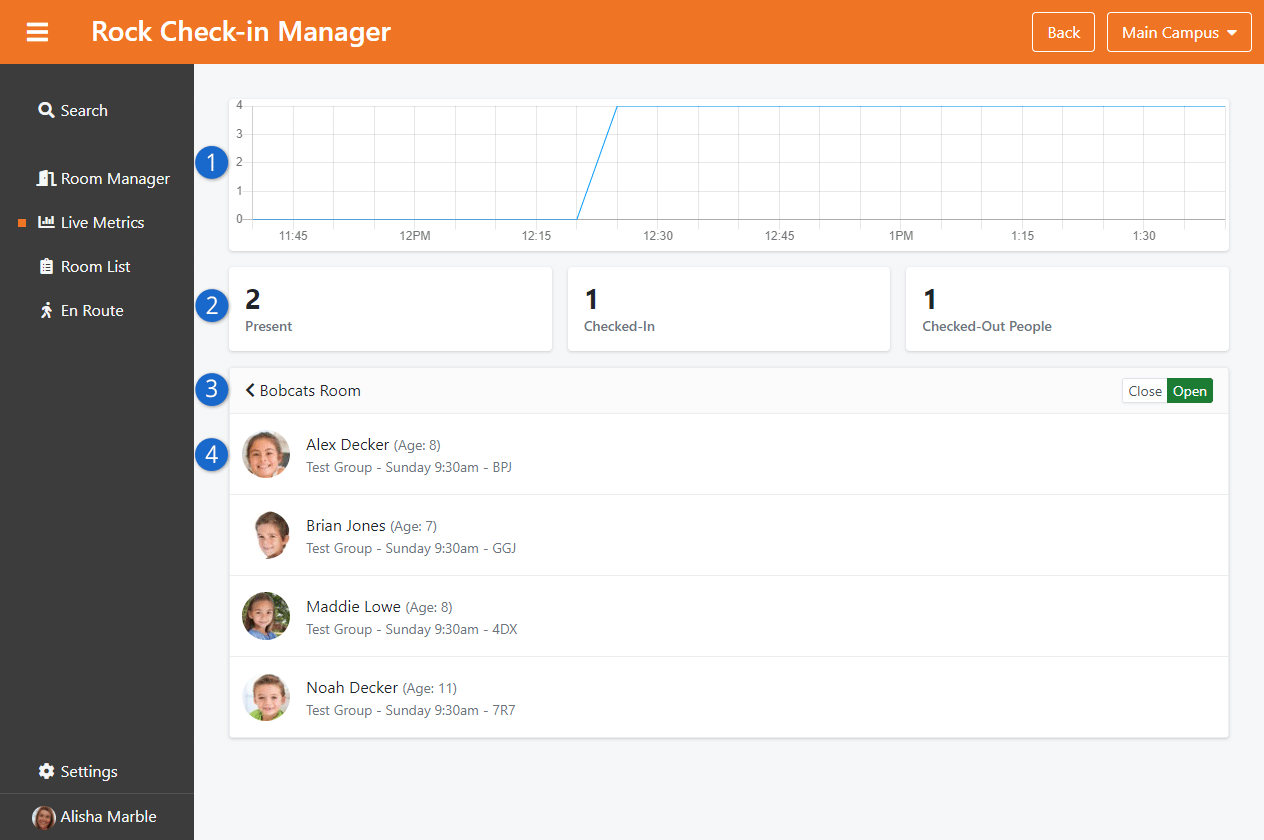
- Check-in Graph – The graph at the top of the page shows you when people have checked in for the area, group or room being viewed. In this case we’re looking at the Bobcats room, so the graph shows when this set of people checked in.
- Check-in Counts – Here you can see counts of how many people are Checked-In, Pending or Checked-Out. Like the graph, these numbers will change if you are looking at a different room or check-in area.
- Location Selection – The example pictured above is showing us information for the Bobcats room. You can click here to navigate up in your check-in structure, to see metrics for a different room, or an entire group or area.
- Person Listing – At the room level we can see individual people with check-ins for that room. Clicking on any of the rows will bring you to that person’s profile.
Settings
Lastly, you can select a different Check-in Configuration to view from the Settings menu. The settings page will allow you to see information for a different checkin configuration.
Texting Parents from Check-in Manager
We’ve all been there—there’s always that poor child in the nursery that just really really needs Mom or Dad. It’s easy enough, using Check-in Manager, for a volunteer to look up the parent’s information, but then what? Do they have to use their personal cell phone to text them? Well, not any more.
To access the messaging feature, click the SMS icon next to a person’s phone number when you’re looking at their profile. As pictured above, this will open up a text box where you can type your SMS message and hit Send to contact the person. The person whose profile you’re viewing needs to have a phone number with SMS enabled. If they don’t, you’ll see their phone numbers listed and linked for calling, but you won’t see the option to send them an SMS message.