UNDERSTANDING TEAMS MEETING OPTIONS
Let’s first start with how the meeting settings are applied, which is per meeting. This is a key piece of information to be aware of. When you set the meeting options we are going to review in this post, remember that they will only apply to the specific meeting you are making the changes on. Default settings, ones that would automatically apply to all meetings, must be set at an organizational level by a Teams admin.
ACCESSING MEETING OPTIONS
Now that we are aware of this caveat, let’s look at how to get to a meeting’s options. This can be done one of three ways.
- In Teams, go to Calendar, select your existing meeting, and then Meeting options in the meeting’s details body.
- From a new meeting invitation (either via Outlook or Teams) select Meeting options in the meeting’s details body.
- During an active meeting, select Show Participants in the meeting controls. Above the list of participants, select Manage permissions.
MEETING OPTIONS BREAKDOWN
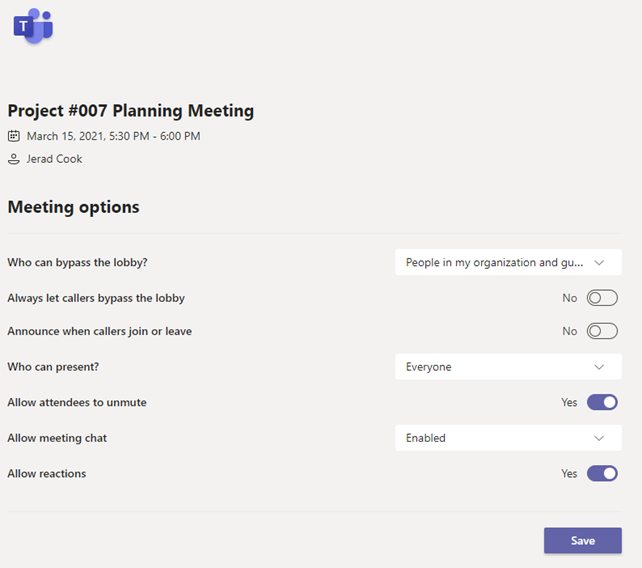
First, you’ll see the name and other details of the meeting who’s options we are adjusting. Remember, these changes will only apply to that meeting. The options that are selected will be based off of your organization wide settings configured by your Teams admin.
WHO CAN BYPASS THE LOBBY?
This option determines who needs to wait in the lobby until the meeting organizer permits them to join, and who will be automatically admitted to the meeting upon joining. It’s important to consider this option if you, as the meeting organizer, plan on joining the meeting from a dial-in audio conferencing option. Admittance can only be accomplished via a Teams client (desktop, web, or mobile all apply).
Microsoft provides a good chart that shows the action for each option, and when it is best to use them, in their official documentation on the subject. At the time of this post, Microsoft has not yet updated this documentation to include the new “Invite only” meeting option that was just announced at Ignite 2021. This new lobby setting will allow you to limit participants to only those explicitly invited to a meeting. Anyone not invited directly, for example someone who was forwarded the invite, will be sent to the lobby.
ALWAYS LET CALLERS BYPASS THE LOBBY
By enabling this option, any attendee that is joining via the dial in audio conferencing option will bypass the meeting lobby.
ANNOUNCE WHEN CALLERS JOIN OR LEAVE
If you want someone joining via the dial in audio conferencing option to have to first provide a recording of their name, which is then played back upon them being admitted to the meeting, enable this. Remember, those who are dialing in will just have their number displayed in the attendee list, so this can be helpful in confirming that the person who joined is someone who should be attending the meeting.
WHO CAN PRESENT?
Use this option to limit who has the ability to present content.
ALLOW ATTENDEES TO UNMUTE
If you plan to use the option to mute all attendees, enable this. Remember that attendees can use the Raise a Hand feature to request to be unmuted, which the presenter can manually do.
ALLOW MEETING CHAT
While Microsoft has made recent improvements to help messages sent in a meeting chat be more apparent to the attendees, you may want to disable it entirely to keep the discussion to voice. This option can accommodate that.
ALLOW REACTIONS
Reactions are also a new addition to meetings. If you’d prefer not to allow attendees to voice their feedback via emojis then you can disable them here.
If you find yourself constantly adjusting your meeting options to the same settings, consider asking your Teams admin about creating a custom meeting options policy that is specifically for you. This is a way to set default options for individuals, instead of enforcing them organization wide.