Sending a Communication Using the RockRMS Communication Wizard
To begin a new communication, go to People > New Communication. The first screen you’ll see, pictured below, is where you’ll pick who you want to send the communication to.
There are many ways to arrive at the Communication Wizard,
- Select from a grid
- Navigate to the page yourself then you can:
- Add individuals manually with a Manual Recipient List
- Use a Communication List
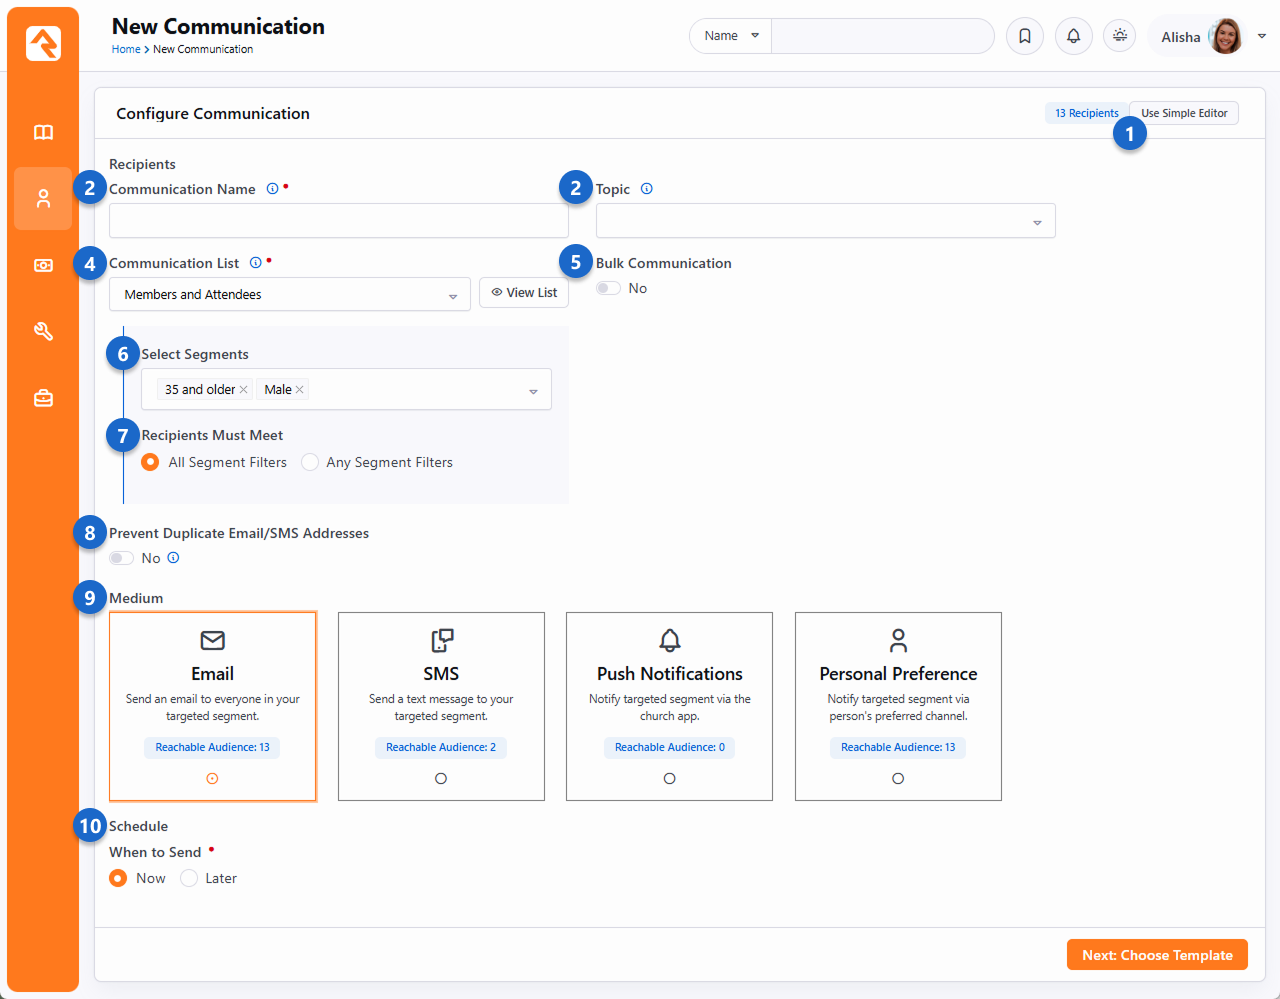
- 1 Use Simple Editor
- Click this button to launch the Simple Editor.
- 2 Communication Name
- This is the name of the communication you’re sending, for internal use only, to help you identify which communications were sent as you look through your history of communications. The name you provide here will not be included in the communication you send.
- 3 Topic
- Specify which campaign or communication topic this falls under (e.g.: Need to Know, Kids Ministry, Student Minsitry.). This is used to group communications, making them easier to find in the future.
- 4 Communication List
- If you want to select individual recipients manually, you can do that here. This lets you create a list of people without using a configured Communication List. If there are more than 1,000 recipients you’ll only see a summary of those who may not receive the communication because, for instance, they don’t have an email address or SMS phone number.
- 5 Bulk Communication
- Here you choose if it’s a bulk (group) communication. When you enable this option, Rock includes a link for the recipient to unsubscribe. Recipients can opt-out of bulk communications as well. You can change the default for this option in the block settings, but we recommend leaving it on.
- 6 Segments
- The Segments feature lets you filter people in the Communication List according to your selections. For instance, you could apply the ’35 and older’ segment to only communicate with people from the ‘Members and Attendees’ list who are 35 and older.
- 7 Recipients Must Meet
- If you’ve chosen more than one Segment then this lets you decide if the people who receive the communication should meet all of the segment requirements, or any one of them.
- 8 Prevent Duplicates
- This setting is only visible if enabled in the block’s settings. People within a family will often share an email address or SMS phone number. Selecting this option will cause only one communication to be sent per email address or phone number. For instance, if spouses share an email address, then only one of them will receive the communication, personalized to that person. In most cases you don’t want this set as the communication will be personalized to only one of the recipients.
- 9 Medium
- In this case we can choose to send an email, an SMS text message or a push notification. Or we can send it using different mediums based on each recipient’s communication preference.
- 10 Schedule Send
- Select when a communication sends, even down to the minute. By default, the communication will be sent immediately after it has been created (and approved, if applicable).
Click Next to advance to the Choose Template screen. This is where you’ll select the email template you want to use to create your communication.
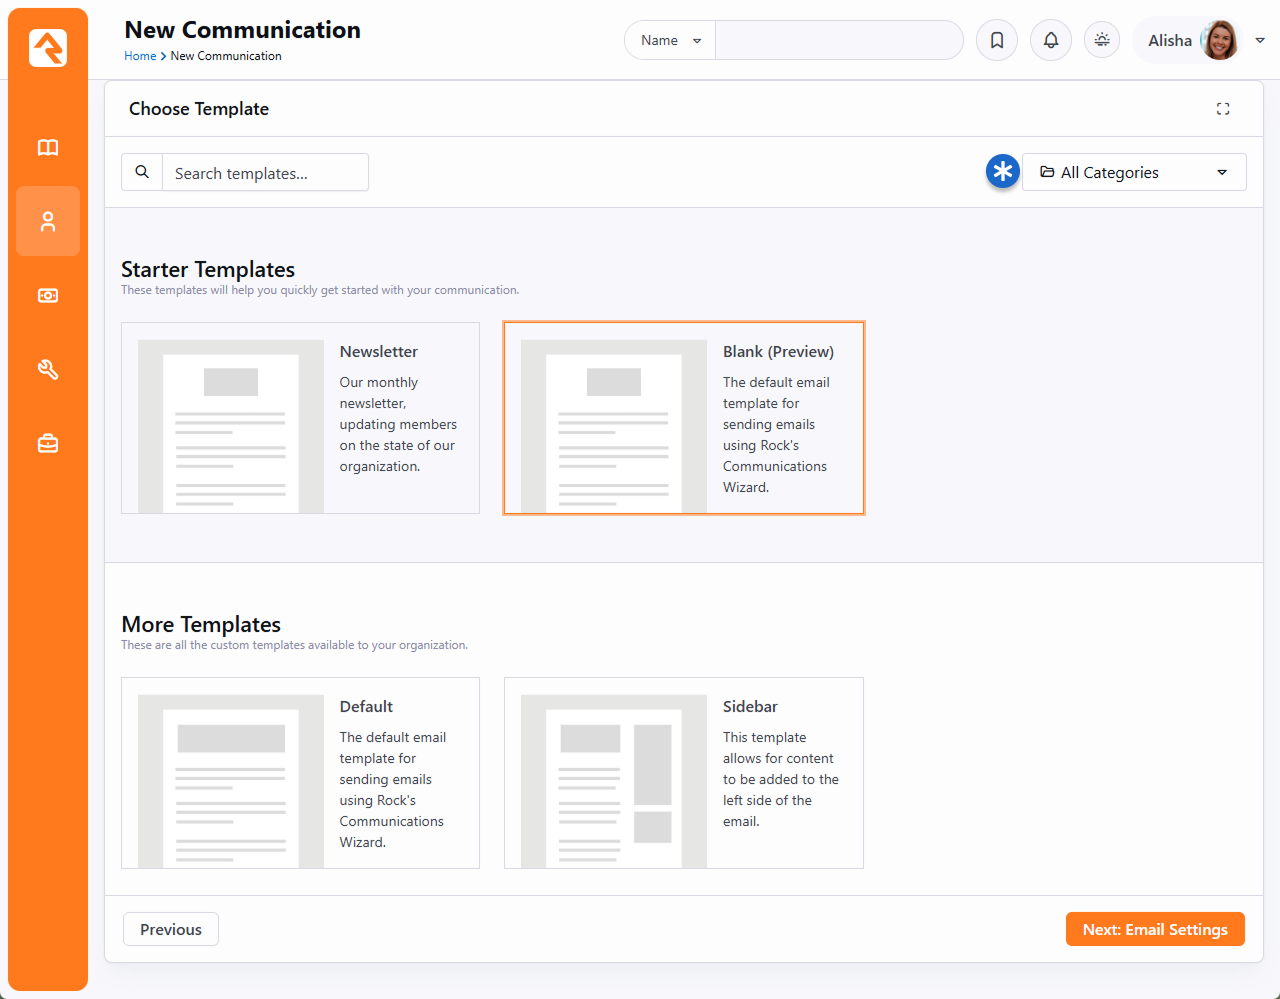
Use the category filter dropdown to help you locate your template.
After selecting your template, click Next to advance to the Email Settings screen. This is where you specify the sender, the subject and any files you want to attach to the message.
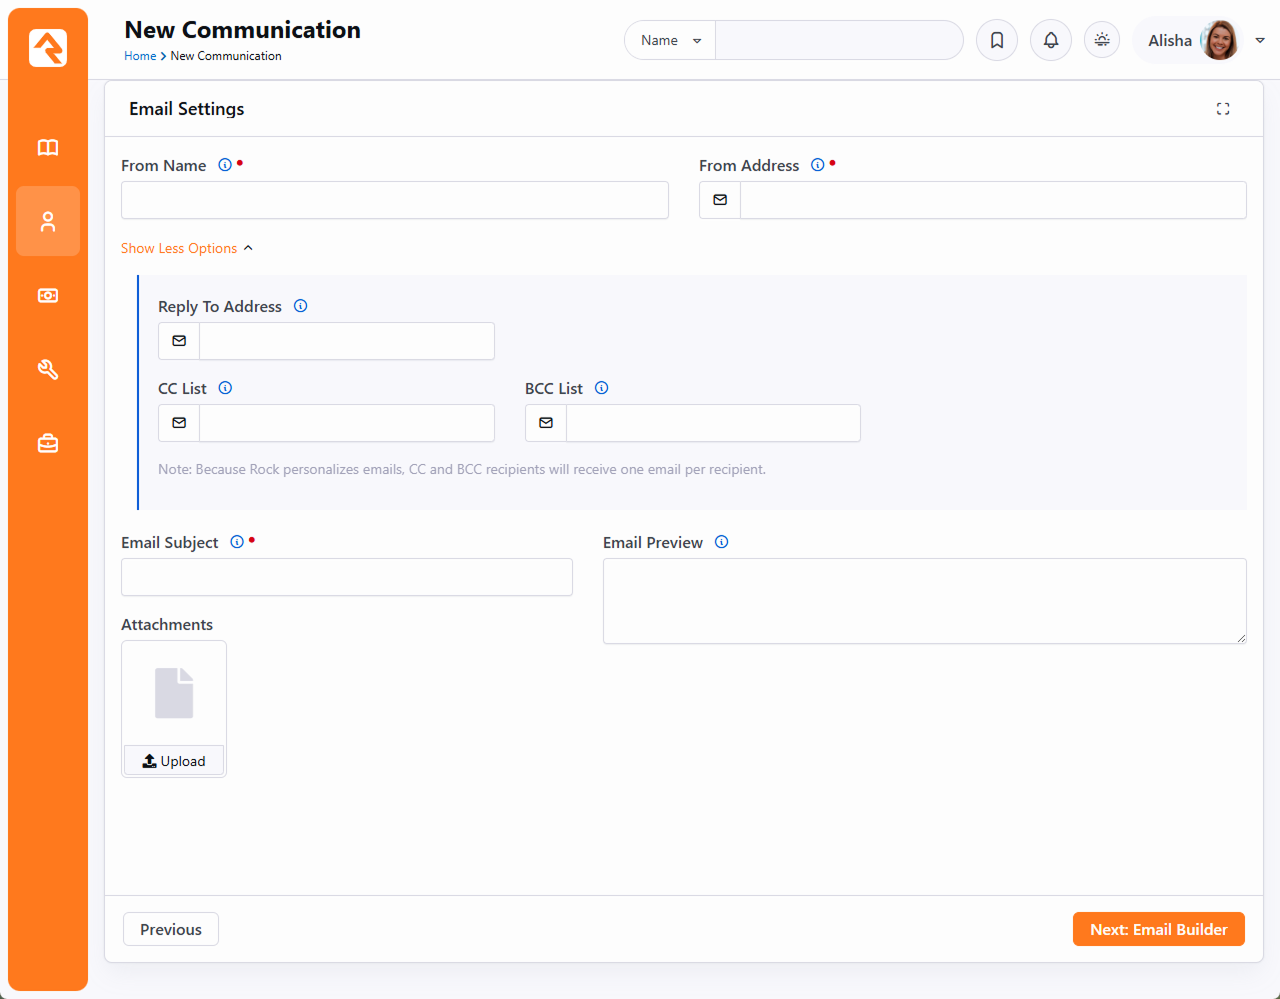
CC, BCC and Personalization
If you use the CC or BCC fields, be aware that each communication is personalized for each recipient, so each email is unique. That means your CC/BCC recipients will receive many messages. Be careful about providing a value here as the recipient can get overwhelmed.
Click Next to advance to the Email Builder. If your communication will be sent by SMS or Push only, then the wizard will skip this screen.
Email Builder
If you spent time coding your email templates in the past, get ready to take a big sigh of relief. The Email Builder gives you complete creative freedom, with no coding involved (unless you want to) and you can save your build as a template! There are three unique screens (Blocks, Sections and Styles) used to configure your email with simple drag-and-drops.
Blocks – Drag-and-drop email content directly to quickly structure your email.
Sections – Create or re-use groups of content, streamlining email building.
Styles – Customize the style of your email from the text to the buttons.
Blocks
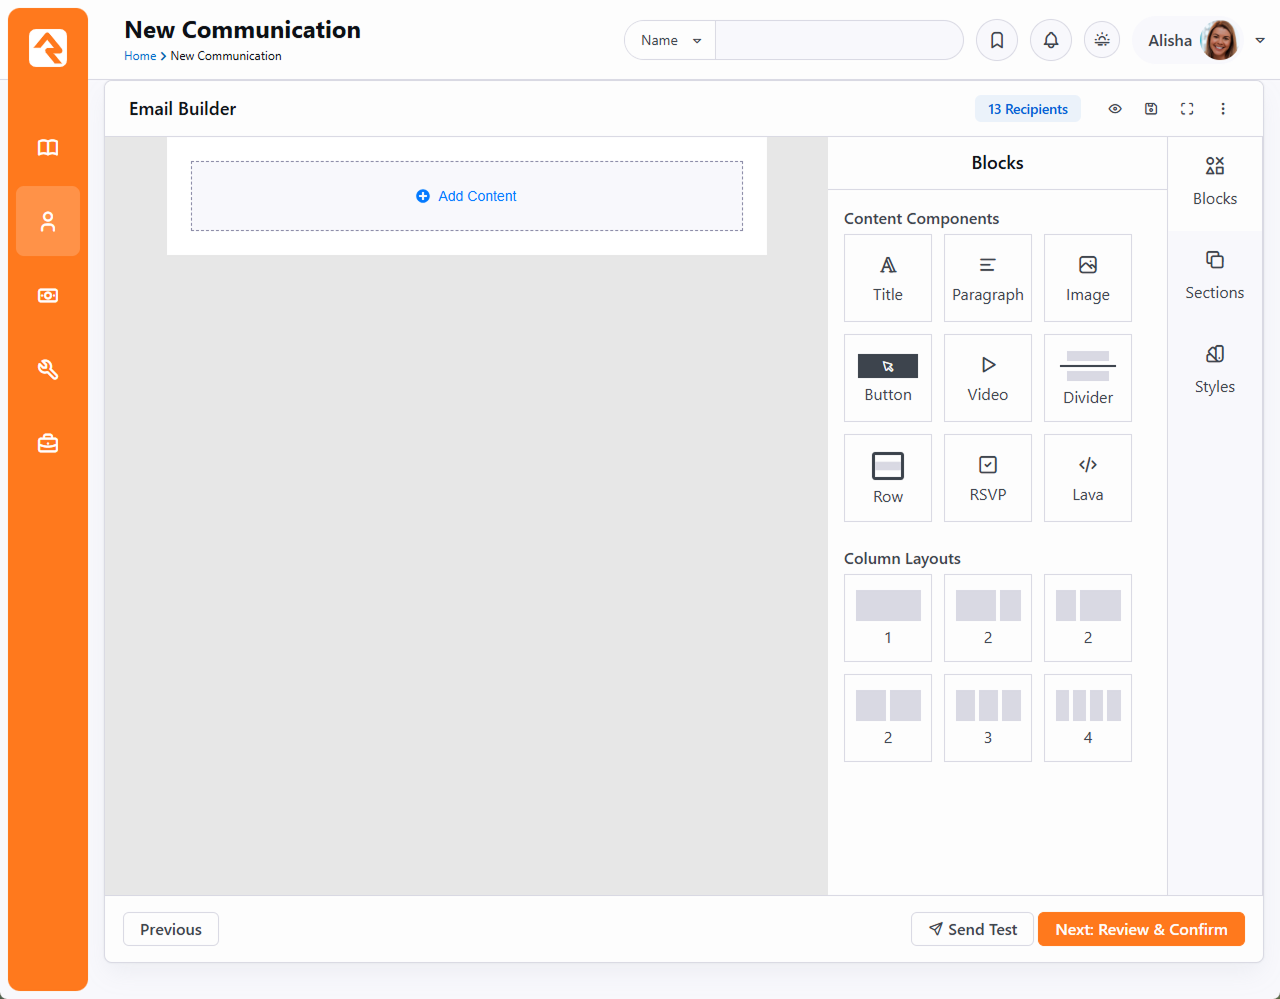
Blocks are the content components themselves. To add an element, simply drag it from the Blocks bar to its resting place in your message.
Content Components
Once you place a component, you can click on it for editing. Try implementing Lava to add a personal touch, change how round your button corners are or insert image and video with ease.
After placing a component, you can edit it by clicking on the section it’s in. The options associated with that component are displayed on the right side of the screen. Notice that the section you’re editing is highlighted with a blue border, and you can view your changes in real time. If you want more of a component or layout, once you have selected one, click . If you decide you don’t want that element after all, click .
Column Layouts
Column Layouts group content in an elegant format. They can be edited to display unique column spacing and alignment. Each layout can be saved as a Section for re-use. That means not only is the format saved, the content is saved as well. More on that below.
At any point while working in the Email Builder, you can send a test email to yourself by clicking the Send Test button. Click to see both desktop and mobile previews of your design. Click to save a draft of your email. Select the ellipsis () in the top right to save your built email as a template.
RSVP Button Setup
We should pause a moment here to note the RSVP button, indicated by the icon. This element is used to send RSVP requests to groups, and it requires some setup in advance. For full details on the Group RSVP feature, schedule some time with Jason or Liz.
Adding Videos to Email
Because of how different email clients work, we can’t reliably embed a video within an email. Using the Video component will let you provide a link to a video, with an associated image, but the video can’t play from inside the email itself. Instead, viewers are redirected to your video hosting provider (e.g.: YouTube, Vimeo and Sardius).
Sections
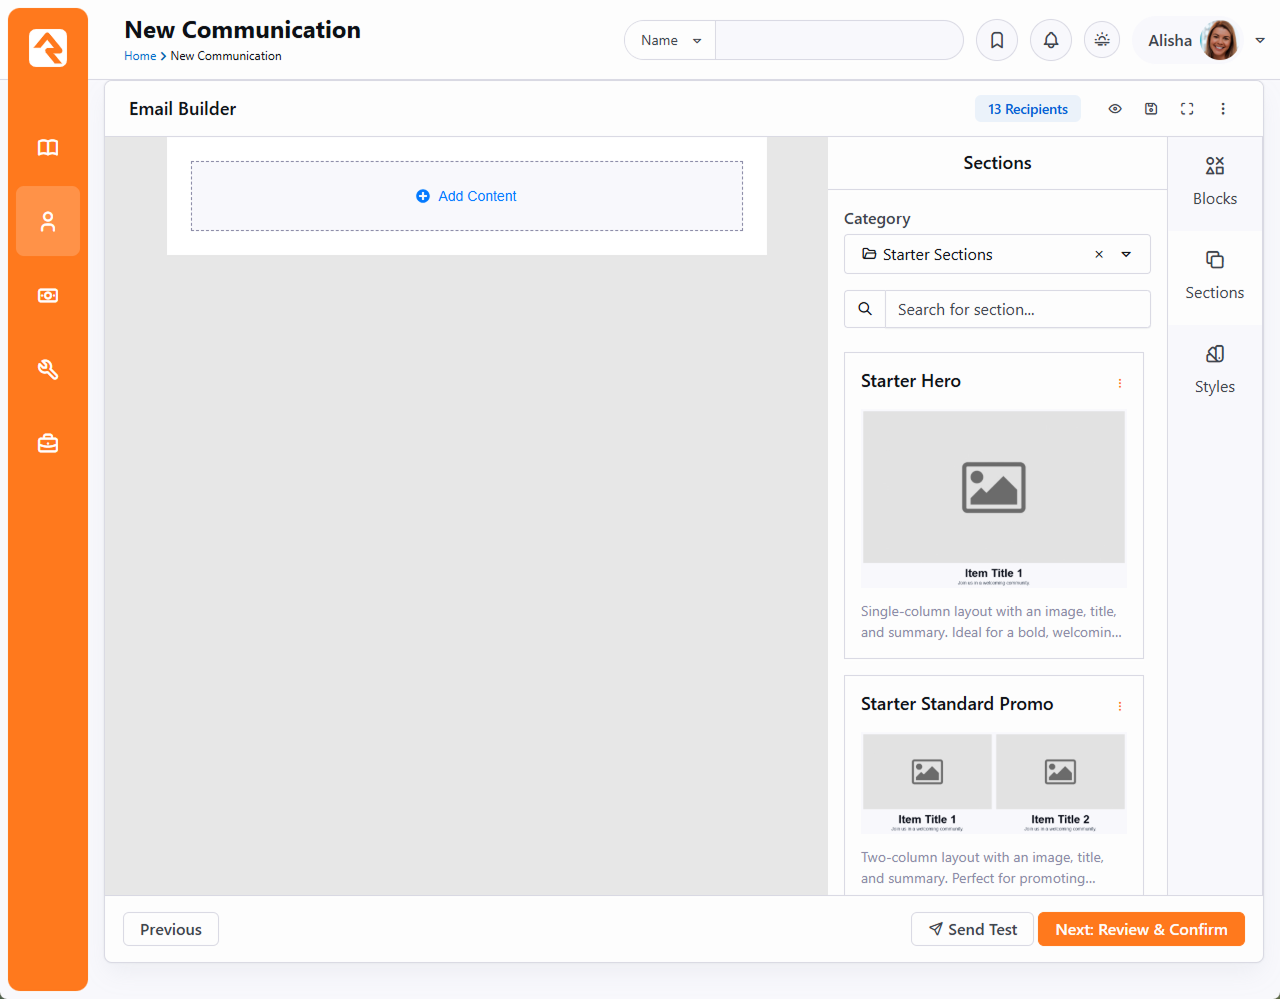
Sections house groups of content that speed up and structure your email building. Drag one in, and you’ve saved yourself from some serious work.
When to use a section:
- If you have a unique paragraph with lots of Lava
- When using a common “Hero” section
- For an often-used header or footer
This can be done quickly by selecting a column and clicking Save, the following screen will pop up.
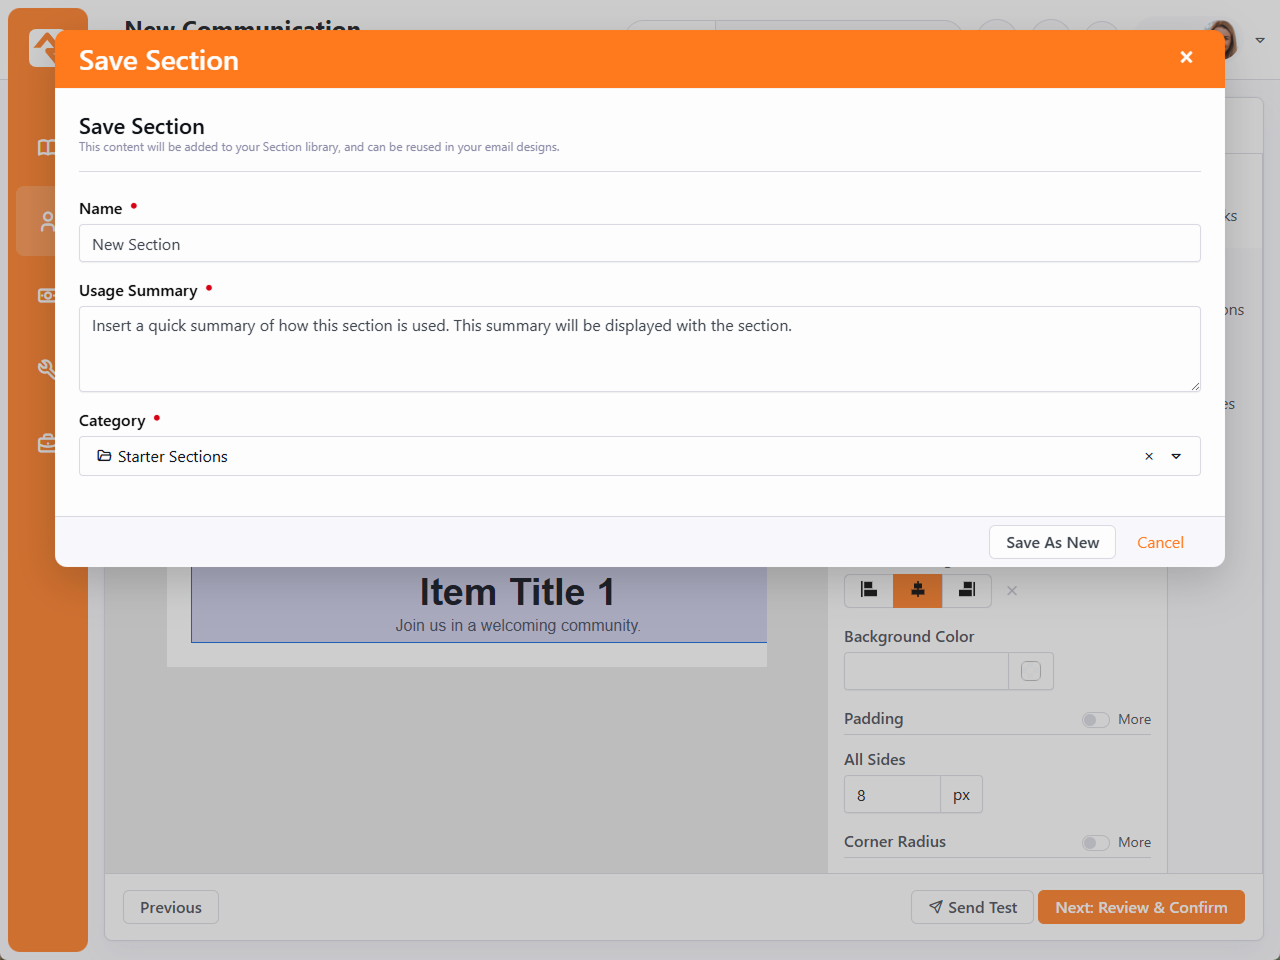
Save yourself some trouble by adding a Name and a Usage Summary, which describes the intended use of your section.
Styles
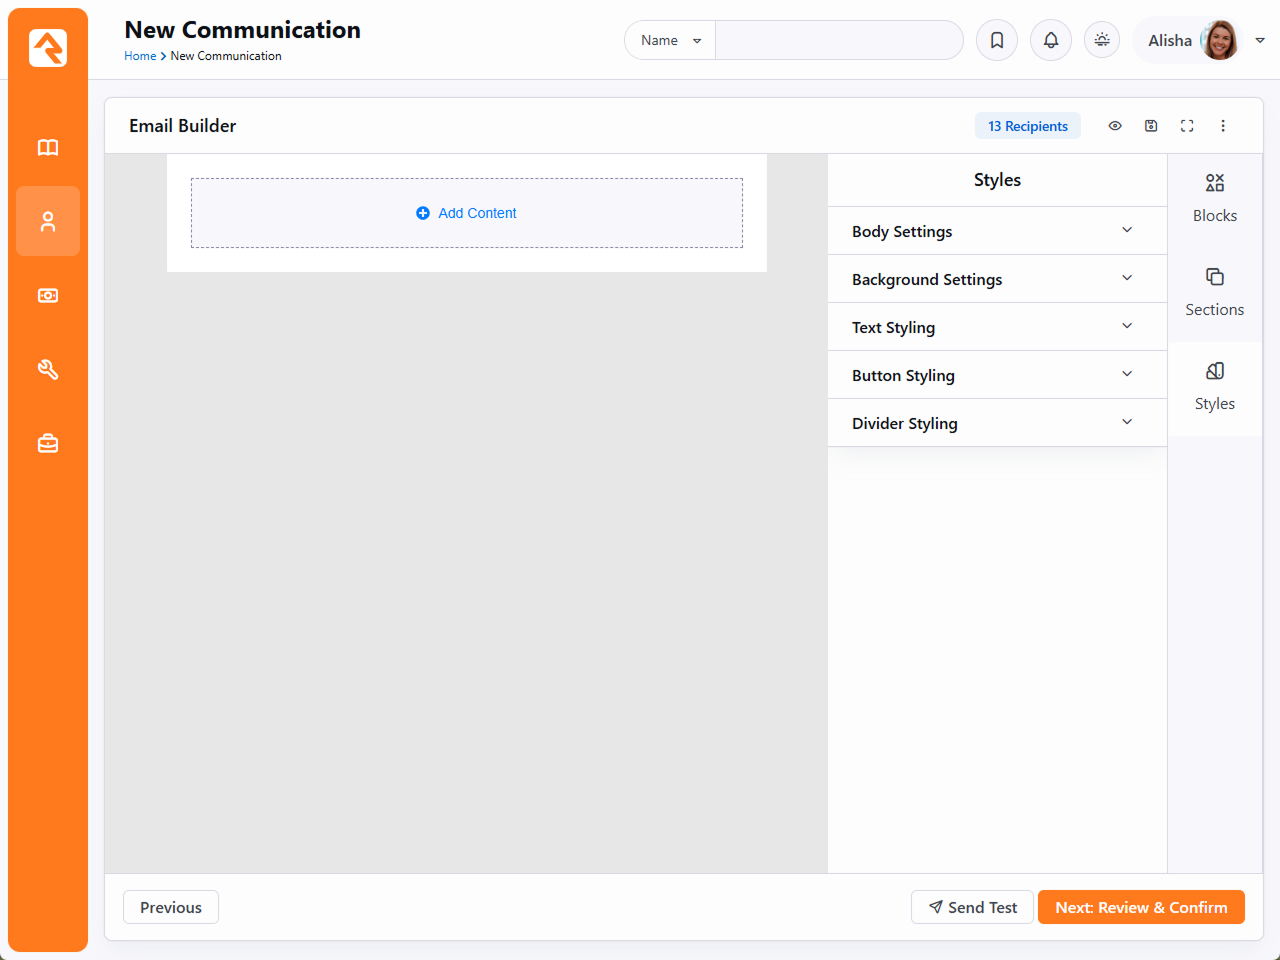
Styling is where you, well… style your email. Each change you make here will affect the entire email, giving you consistent style from top to bottom.
This allows you to select the overall design of your email and provide default values for things like heading, text and buttons.
-
- Body Settings
Configure the color, alignment and spacing of the body.
-
- Background Settings
Change your background color or upload an image to alter your email’s backdrop.
-
- Text Styling
Edit text font, size and color globally, or refine styling for each heading.
-
- Button Styling
Globally alter button color, font, padding, size and even corner radius.
-
- Divider Styling
Change the style, color, alignment and size of each divider.
Templates
You can now save your built email as a template, no more HTML coding! Communication is rinse and repeat, when you save this template it will take a screenshot as a thumbnail, and you can access this layout in the future with ease. To start, select the ellipsis in the top right (), then “Save As Template” to open the “Save As Template” screen.
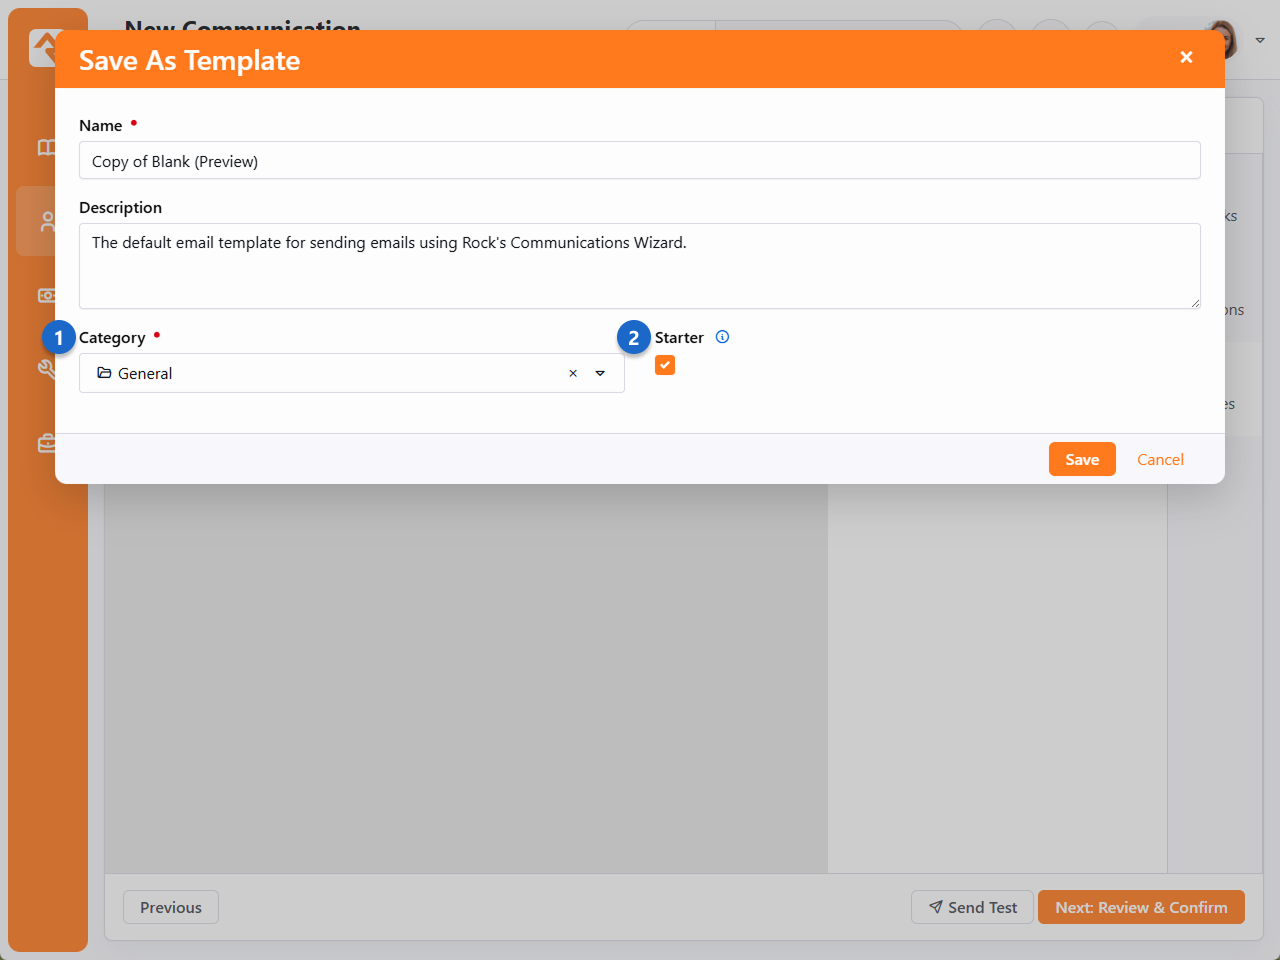
- 1 Category
- When you have a lot of templates, categories simplify the search process. To add a new one, navigate to Settings > Communications > Communication Template Categories and click .
- 2 Starter
- Starter Pins the saved template to the top of the selection screen for the chosen Category. We suggest you only make your most used templates a starter, the 20% of the templates that you use 80% of the time.
Preview As
By selecting the icon, you can preview any communication in Rock. To add a personal touch, you can even view it as a specific person in your database, or even a segment, giving you the opportunity to test personalization features such as Lava or Adaptive Messages.
Preview As Person

Select an individual with the handy picker and see exactly how it will look in their inbox.
Preview As Segment

When a segment is selected, the system will display a preview using a random person from that segment. Note that this individual may not be an actual email recipient. They may also belong to multiple segments, which could influence how personalization appears in your preview depending on your settings.
When everything is set up and looks the way you want, click Next to go to the SMS Editor screen. If your communication will be sent by email only, the wizard will skip this screen. The SMS Editor is similar to the Email Editor. This is where you design how your SMS message will appear.
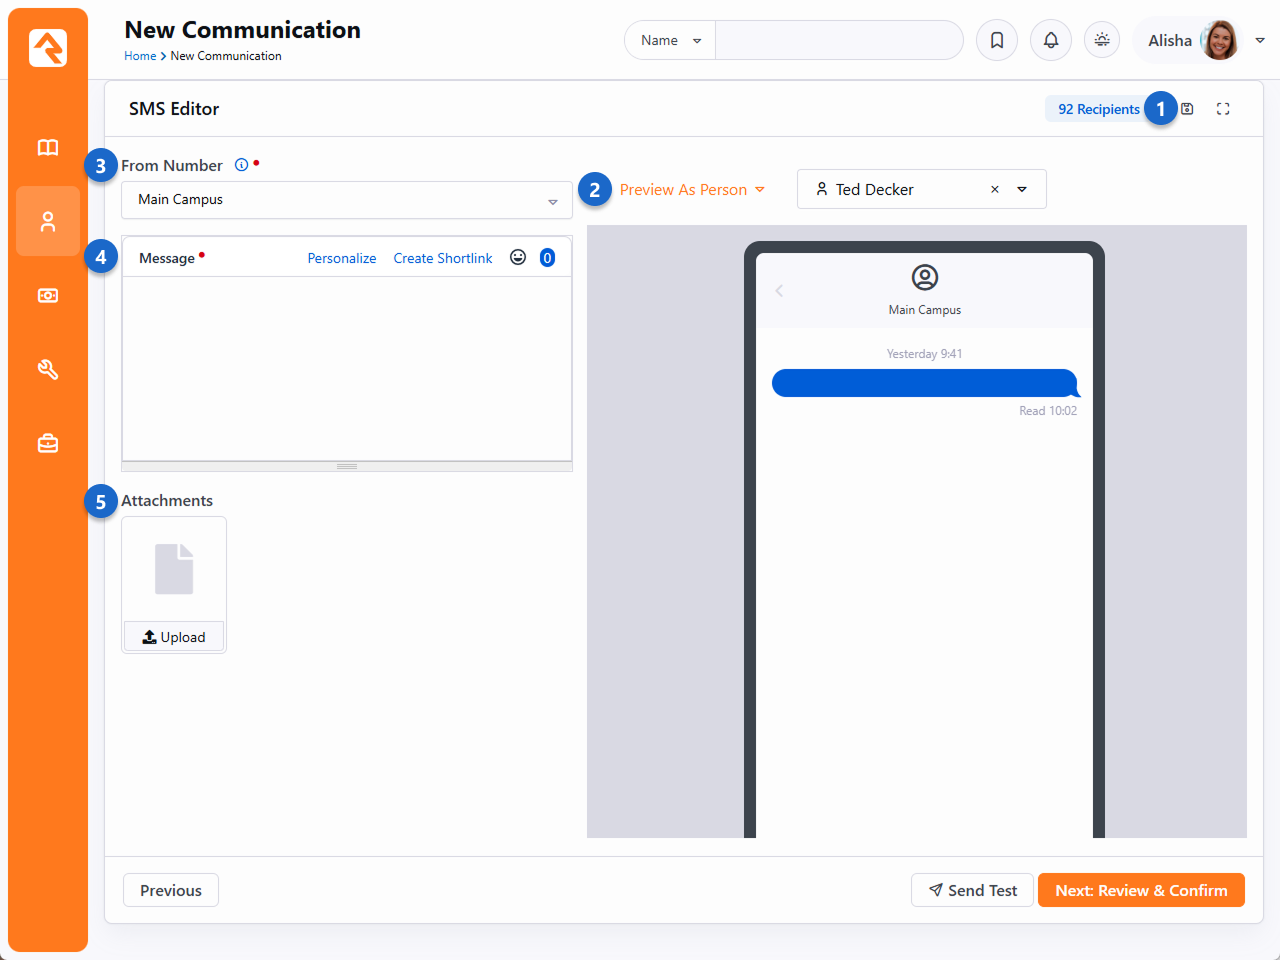
- 1 Save
- Select the SMS phone number from which the text message will be sent. Unless specified in the block’s settings, this list will contain all active SMS phone numbers you have configured.
- 2 Preview As
-
- Person: Select a person to preview the message using their data.
- Segment: Choose a personalization segment to preview with a sample person from that group. If the segment has no people, a warning appears. The previewed person’s name shows in the Previewing As field but may not be an actual recipient.
- 3 From Number
- Personalization has never been easier. Use the list here to populate your message with the Lava you’ll need to truly customize and personalize content for each recipient.
- 4 Message
- This area is where you’ll compose the actual content of your message. Personalize any message using lava, create a shortlink, add emojis or check your character count.
- 5 Attachments
- Upload files that will be sent with the message as an attachment.
Click Next when you are ready to move on. If you’re sending the communication via a Push Notification, then you’ll see the Push Notification Editor screen instead of the Email and SMS screens described above.

- 1 Save
- Click this to save a draft of your Push Notification.
- 2 Preview As
-
- Person: Select a person to preview the message using their data.
- Segment: Choose a personalization segment to preview with a sample person from that group. If the segment has no people, a warning appears. The previewed person’s name shows in the Previewing As field but may not be an actual recipient.
- 3 Application
- Select which mobile app to send this notification from, if you have multiple.
- 4 Title
- This will be the title of the push notification and will be seen by the person receiving it.
- 5 Push Message
- This is the main content that the person will see. Personalize notifications with merge fields, add emojis and check your character count.
Re-send the Same Communication
Your time is valuable, you don’t have to churn out duplicates of the same email. Instead, click the button from the Communication History page. This will take you back to the beginning of the Communication Wizard, keeping the settings and design options of the original communication.
Pretty cool, right? With the Communication Wizard, you’re going to be rocking email and SMS messages in no time.