Migrating to or Installing Microsoft 365
Microsoft 365
There are 2 levels of Microsoft subscription we provide.
- Microsoft 365 Business Basic is given to anyone with a CedarCreek email account. This includes volunteers and even device specific accounts. This provides access to an email account, webmail, Teams, OneDrive (1TB of cloud storage), and access to Microsoft web apps for Word and Excel.
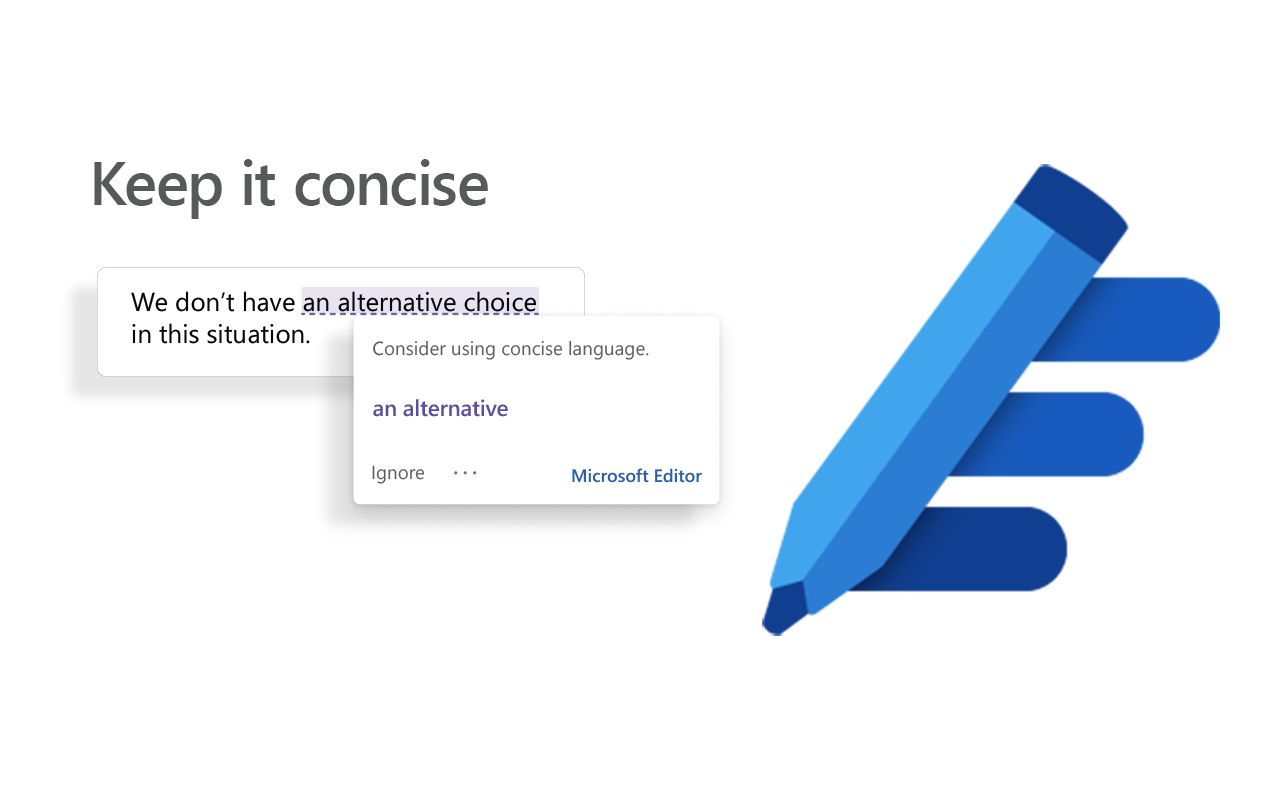
- Microsoft 365 Business Standard accounts are provided for staff only. These paid licenses give all of the above plus the ability to download/install the Office suite of apps on up to 5 devices. Word, Excel, PowerPoint, Outlook, Access, and Publisher apps are included as well as the cloud apps for Word and Excel and services like Teams and OneDrive. In addition, this gives the latest feature updates and access to things like “Microsoft Editor” (a Grammarly style helper) and access to “Microsoft Clipchamp” (a basic video editor).
Please keep in mind, this is for YOUR use and logging into your account on other devices will give users of that device access to your files… so this isn’t a “install on my kid’s laptop” kind of deal, rather it is for your home office computer you may use in addition to your work laptop.
If you have any questions about your level Microsoft licensing, please don’t hesitate to ask. The rest of this article only pertains to CedarCreek staff (who all have the Business Standard level of license).
Please read all the instructions. It’s easy to follow pictures, but answers to your questions and important notes are in the text.
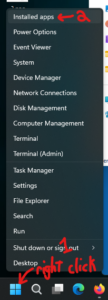
- Right click on your start menu and choose “Installed Apps”
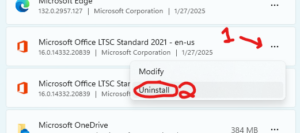
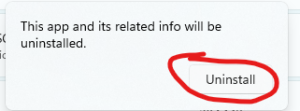
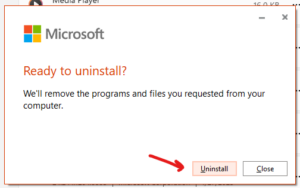
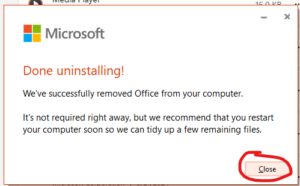
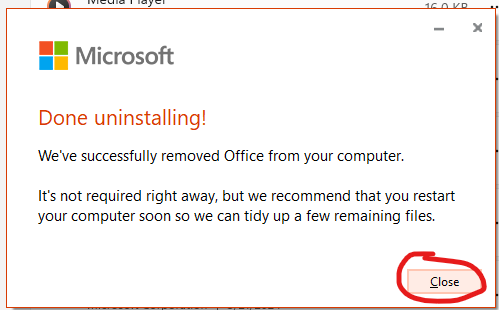
- Scroll down in the list and find your Microsoft Office version. If you don’t see any in the list, great! Skip to step 3. If it says a year in the name, it needs to be uninstalled. You may see multiple entries and one will have “proof” in the title. That one is a proofing tools install that will remove itself when you remove the main entry. Click the three dots to the right of the main entry and select “uninstall” followed by a series of “uninstall” buttons until it completes and then click “close” when done.
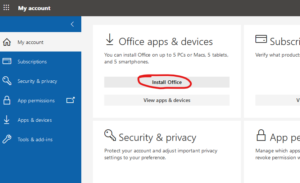
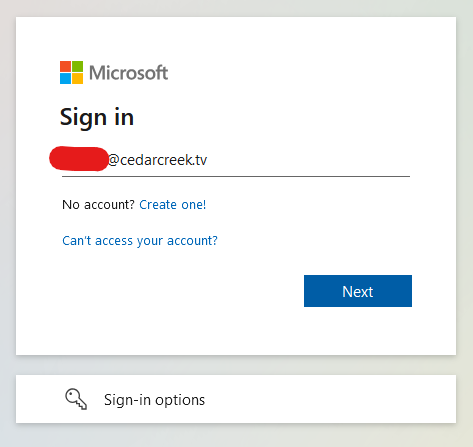
- Now we need to install Microsoft 365. Open your web browser and go to https://portal.office.com/account and if asked, log in with your CedarCreek email credentials.

- At the top you’ll see an “Install Office” button. Click that and wait for the file to download. But read step 5 before clicking on the downloaded file…
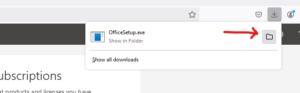
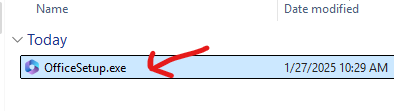
- You won’t have security permissions to run this from the download dropdown, so click the “view folder” icon next to it to open that folder and then run the file from there by double clicking it.

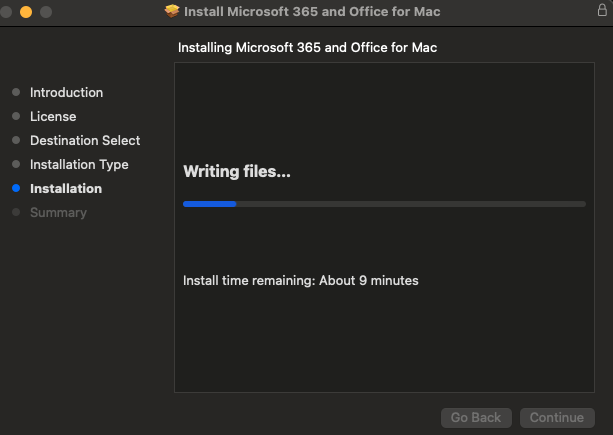
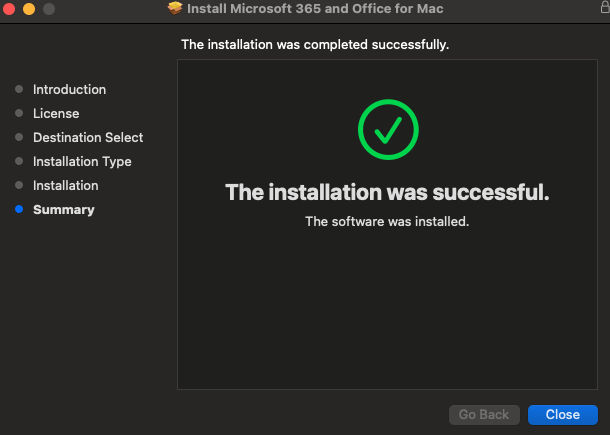
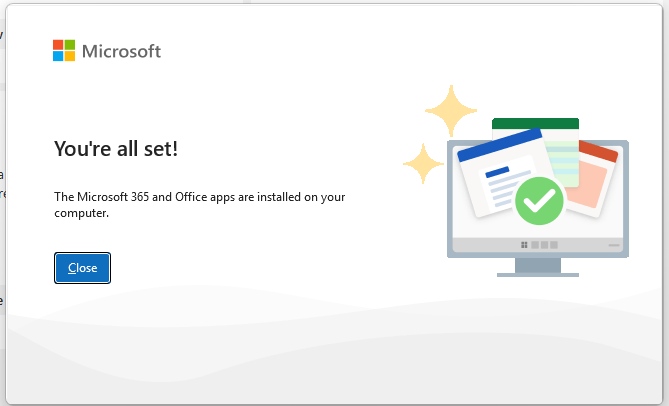
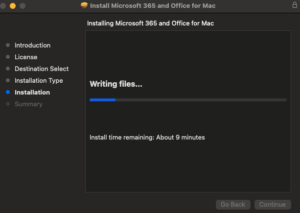
- Now you should see the installer open. Be patient as this process can take 10 minutes or so to download all the files and install the software. Go through any prompts to confirm you want to install if there are any and once complete, hit “Done” or “Close”.

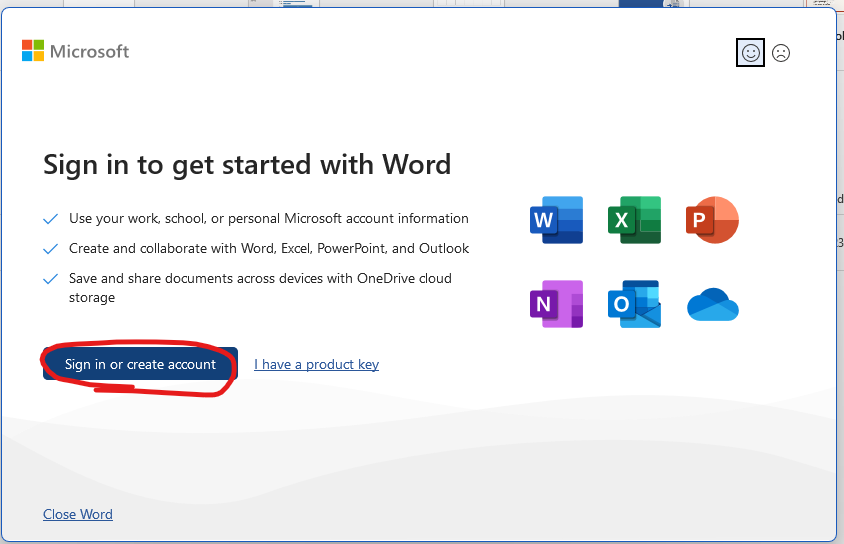
- Now it may prompt you to log into your Microsoft 365 account. This is your normal CedarCreek email and password. If it doesn’t, skip to the step 8.


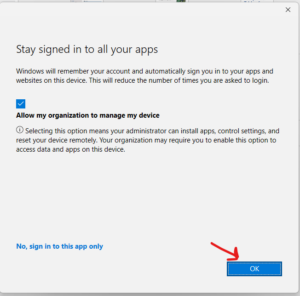
- Lastly, depending on if you’ve done this on your machine before, it may open a window that is similar to this (not exact) and ask if you want to stay logged in or if you want to register this device… The answer is “yes” or “ok” and it should complete after a few seconds. If you don’t see this, skip to step 9.
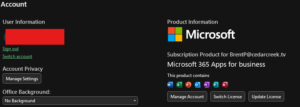
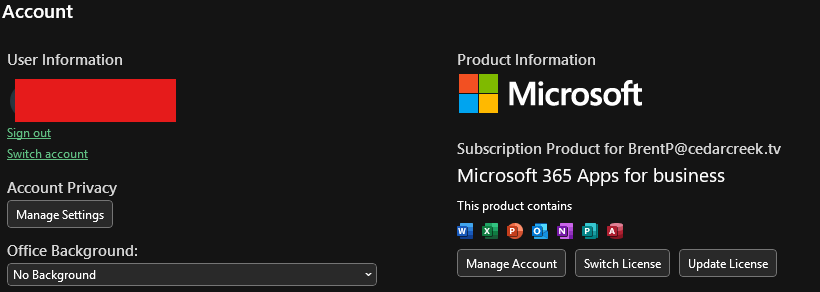
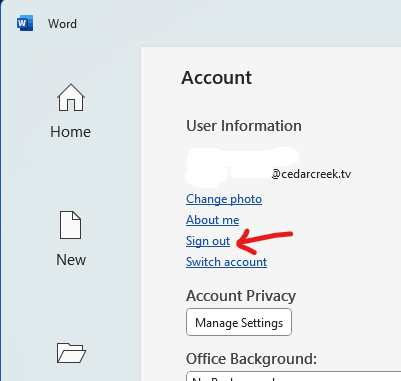
- That’s it! You’re all set. If you want to open Word or Excel or one of the apps and click on “Home” (or “File” if you are in a file already) and then “Account” you can see if you are logged in and can confirm you are on the Microsoft 365 version. At first load, the splash screen may still say “Office LTSC 2021” or something similar, but if you close and re-open the program it will update to Microsoft 365. Note: Microsoft is currently working on “Outlook (new)” and your normal “Outlook” icon may have been removed from your pinned apps on your start menu or taskbar. You can use either the now named “Outlook (classic)” or “Outlook (new)” apps going forward, though they will likely force all users to the “new” interface at some point. If you click on your start menu and search “Outlook” you should see both options. Right click which you want to use and pin it to your taskbar.

- Should you want to sign OUT of your account (you can only be signed into 5 devices at a time) you would do that from this same area by clicking “Sign Out” under your name. This renders the software unusable on the machine, but it also locks others from having access to your files if they are on the machine.


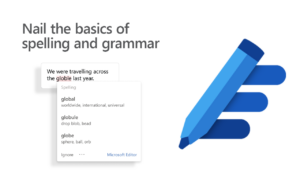
- Lastly, you may want to install the Microsoft Editor browser extension so you have Grammarly style help with any web page you may be composing content into (such as emails in Rock). This plugin works with Google Chrome and Microsoft Edge.
– For Chrome: Microsoft Editor: Spelling & Grammar Checker
– For Edge: Microsoft Editor: Spelling & Grammar Checker


If you previously had Office software, you are likely already running the latest 365 subscription. The apps auto-updated when we changed the license for your account. We also have made it available from our Mac management server to self-install if you don’t have it on your machine for some reason. Here is how you can check to see if it is on your machine already, and past that are instructions on how to install it on other mac devices you may own and wish to install onto. Please keep in mind, this is for YOUR use and logging into your account on other devices will give users of that device access to your files… so this isn’t a “install on my kid’s laptop” kind of deal, rather it is for your home office computer you may use in addition to your work laptop.
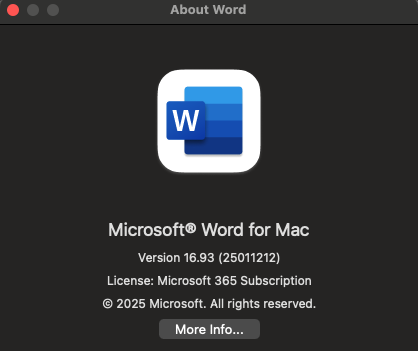
- Open Microsoft Word by either a shortcut on your dock, by opening the app launcher (pinching track pad with 4-5 fingers), or by pressing Command-Space and searching for “Word”.
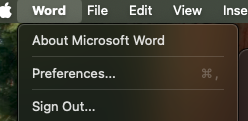
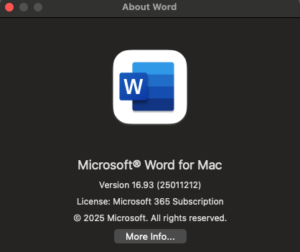
- Click the “Word” menu at the top left next to the apple menu, and choose “About Microsoft Word”. The third line down on the window that opens should show the license version. If you see “Microsoft 365 Subscription” then you are all set. If you see “Office LTSC Standard for Mac 2021” or something like that, then you are still on the old version. If that’s the case, make sure you are signed into your office software with your CedarCreek account and then check again. If you need further help, reach out to admin@cedarcreek.tv for further assistance.
- Lastly, you may want to install the Microsoft Editor browser extension so you have Grammarly style help with any web page you may be composing content into (such as emails in Rock). This plugin works with Google Chrome and Microsoft Edge. There is no Safari version of this extension at this time.
– For Chrome: Microsoft Editor: Spelling & Grammar Checker
– For Edge: Microsoft Editor: Spelling & Grammar Checker
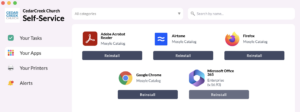
- Press Command-Space and search for “Self-Service” or click the CedarCreek Church “Self-Service” icon from the Launchpad.

- Choose “Your Applications” from the left and click “Install” or “Re-Install” under Microsoft Office 365. This will take 10 minutes or so depending on your internet connection speed as it downloads multiple GB of files, so be patient.


- Open your web browser and go to https://portal.office.com/account and if asked, log in with your CedarCreek email credentials.
- At the top you’ll see an “Install Office” button. Click that and wait for the file to download. Open it once it has downloaded.

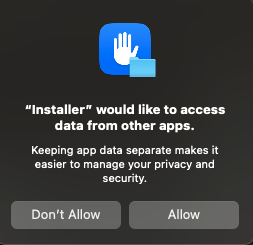
- Run through the installer with default options and if it asks if it can access data from other apps, “Allow” it so it can pull in past Office data from any previous installs.

- When it completes, it will ask if you want to automatically move the install file (in your downloads folder) to the trash. Say “Move to Trash” as this will free up about 3GB of space on your drive.

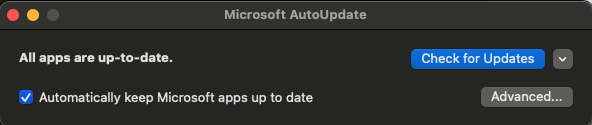
- The auto-updater app may open. If so, you can “Check for Updates” and if it has any, let them install. If it doesn’t have any, feel free to close this.

- Now we need to confirm you are on the right versions and logged into your apps. Open Microsoft Word by either a shortcut on your dock, by opening the app launcher (pinching track pad with 4-5 fingers), or by pressing Command-Space and searching for “Word”.
- Click the “Word” menu at the top left next to the apple menu, and choose “About Microsoft Word”. The third line down on the window that opens should show the license version. If you see “Microsoft 365 Subscription” then you are all set. If you see “Office LTSC Standard for Mac 2021” or something like that, then you are still on the old version. If that’s the case, make sure you are signed into your office software with your CedarCreek account, close and reopen the app, and then check again. If you need further help, reach out to admin@cedarcreek.tv for further assistance.
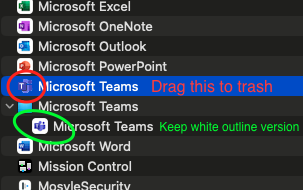
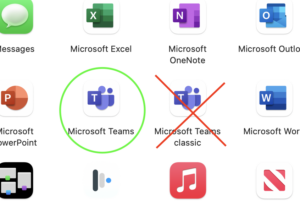
- Lastly, we need to address the numerous versions of Microsoft Teams that they have released over the years. They have finally settled on a single “unified” version, but in the journey to this point, you SHOULD have the correct “Microsoft Teams” with a purple log on a white background that matches your other Office app icons, but you may have “Microsoft Teams classic” or “Microsoft Teams” with a purple logo and no background. Make sure all Teams software is closed and let’s get rid of all but the one we need.
- Press Shift-Cmd-C to open the “Computer” view (or from Finder, click “Go” in the menu bar and choose “Computer”).
- Navigate to “Macintosh HD – Applications” and drag any except for the white backed “Microsoft Teams” to the trash.
Note: Sometimes the installer puts them in a sub-folder if one already exists with the same file name. That’s fine to ignore. It doesn’t matter if they are in the base “Applications” folder or in a sub-folder, they will still show up in your Launchpad app.

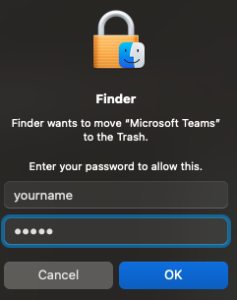
- Right click the trash and “Empty Trash” to fully remove them. Note: Sometimes opening the newly installed “correct” version will auto-delete the “classic” version from the machine, as Microsoft is trying to clean up their mess as well. But if you still see multiple versions, feel free to do the above to keep things tidy.

- Lastly, you may want to install the Microsoft Editor browser extension so you have Grammarly style help with any web page you may be composing content into (such as emails in Rock). This plugin works with Google Chrome and Microsoft Edge. There is no Safari version of this extension at this time.
– For Chrome: Microsoft Editor: Spelling & Grammar Checker
– For Edge: Microsoft Editor: Spelling & Grammar Checker